To create a connection between a ViewX client and a Third Party OPC server:
- On the ViewX client, use the Windows Start menu to access ClearSCADA’s Configure Connections option and run the ClearSCADA Client applet.
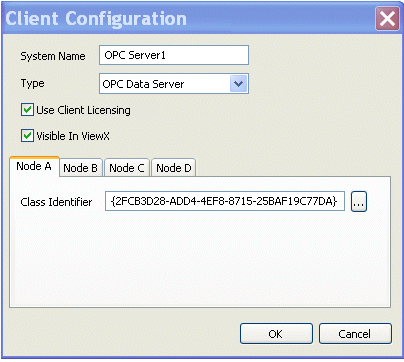
- Select the Add button to display the ClearSCADA Client Configuration window.
- Define a name for the system in the System Name field. The name that you enter will be the name that is shown for the system in the OPC Data Bar in ViewX.
- Use the Type combo box to define the type of OPC server to which the ViewX client is to be connected. You need to choose the option that matches the type of OPC server being used, for example, if the ViewX client is to be connected to an OPC Historic server, you need to choose the OPC Historic option. If you are unsure which type of OPC server is used, we recommend that you choose the OPC Data Server option (as many OPC servers are OPC data servers; OPC alarm servers and OPC historic servers are less common).

- Leave the default setting for the Use Client Licensing check box in place (it has no effect on ViewX client - Third Party OPC server connections).
- Use the Visible in ViewX check box to define whether the OPC server will be visible in ViewX (shown in the OPC Data Bar).
- Select the Visible in ViewX check box to set ViewX to connect to the Third Party OPC server via the connection. The OPC server will be available in ViewX (via the OPC Data Bar or OPC Historic Data Bar), which means operators, engineers and administrators can use the client to interact with the OPC server.
- Clear the Visible in ViewX check box to stop ViewX from providing access to the OPC server via the selected connection. If you clear the check box, the connection will be operational and can be used by other OPC applications on the ViewX client but will not be used by ViewX itself.
- Use the Node tabs to define which Third Party OPC servers can be connected to via the connection. Each Node tab represents one Third Party OPC server, with the Class Identifier setting being used to choose the appropriate OPC server.

The Class Identifier is provided by the Third Party OPC server during its installation. You just need to select the appropriate Class Identifier for each Node.
For example, if the ViewX client is to connect to 2 Third Party OPC servers via the connection, you would use the Node A tab and Node B tabs. On the Node A tab, you would use the browse feature of the Class Identifier field to choose the class identifier of the first OPC server (the class identifier consists of the Name of the OPC server and its unique Class Id code). On the Node B tab, you would use the Class Identifier field to choose the class identifier of the second OPC server.
- Select the OK button to confirm your selections and close the ClearSCADA Client Configuration window.
- Select the Close button on the ClearSCADA Client applet.
When you run ViewX, the connection between ViewX and the Third Party OPC server will be available. If you have configured the connection to have the Visible in ViewX setting enabled, you will be able to browse to the OPC server via the OPC Data Bar or the OPC Historic Data Bar, depending on the type of OPC server.
If ViewX was running while you were configuring the ViewX - Third Party OPC server connection, you will need to exit ViewX then run it again before you can access the Third Party OPC server.