In order to use ClearSCADA data in a report, the Crystal Reports application needs to access the ClearSCADA database. In order to do this, you need to specify an ODBC connection to the database. You need to specify this connection whenever you create a report or subreport.
A system administrator needs to set up one ODBC DSN per ClearSCADA database when ClearSCADA and Crystal Reports are first installed (see Installation on ViewX Clients on Which You Want to Edit Reports).
To specify an ODBC connection to the ClearSCADA database from a report that is being produced using Crystal Reports:
- View your report on the Design tab of the Crystal Reports application (or, in the case of a subreport, the relevant subreport tab).
- Select the Database menu.
A context sensitive menu is displayed. - Select the Database Expert option.
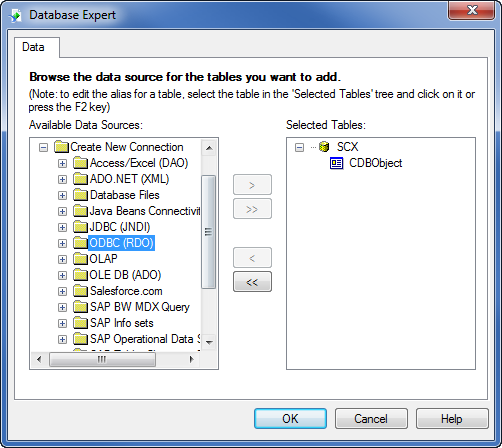
The Database Expert window is displayed.
- Expand the Create New Connection entry in the list of Available Data Resources.
- Expand the ODBC (RDO) entry.
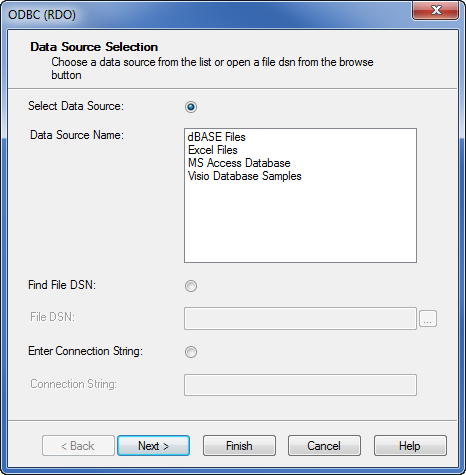
If a connection already exists to the ClearSCADA database, an appropriate entry will be displayed here—see Provide Access to the Relevant Database Tables. If no connection exists, the ODBC (RDO) window is displayed.
- Select the required entry from the Data Source Name list (the required DSN may, for example, be labelled to reflect the name of your system or site—see your system administrator for details).
- Select the Next button.
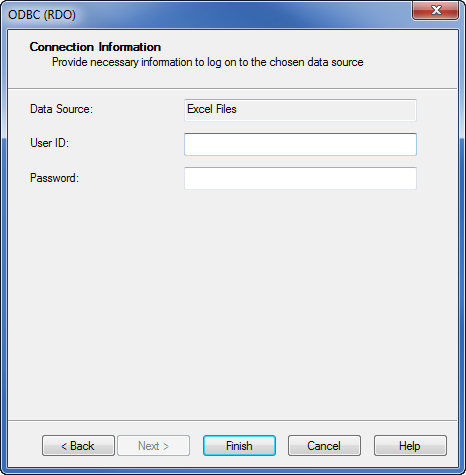
The Connection Information page is displayed .
. - Specify the User ID (name) and Password that allow the Crystal Reports application to access the ClearSCADA database.
This would typically comprise the ClearSCADA logon name and password of the User that is specified on the Crystal Report tab of the Crystal Report Form (if any), but may comprise any other name and password combination that provides sufficient access to the ClearSCADA database.
The User ID and Password combination that you specify determines what data is included in the report. (The report can only include ClearSCADA data to which this user account has access.)
Be aware that if the User ID differs to that specified on the Crystal Report Form (see Specify the Data Source), the report may differ in content whenever it is generated, printed, or exported, as to when the report is being edited.
- Select the Finish button.
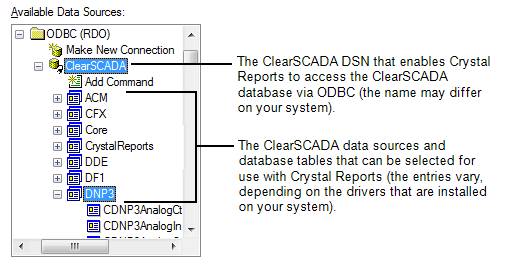
The ODBC (RDO) window is closed. The ClearSCADA DSN is added to the list of ODBC (RDO) database connections.The expanded ClearSCADA entry displays a hierarchical list of ClearSCADA data sources. The list varies, depending on the drivers that are installed on your system. Any custom database tables, such as Data Grid tables, are included in the list.
- Expand the list of ClearSCADA data sources as required.
A list of the database tables applicable to that particular component or driver is displayed.
- Specify which tables you want to use in the report (see Provide Access to the Relevant Database Tables).
- Select the OK button to confirm the settings.
The Database Expert window is closed.