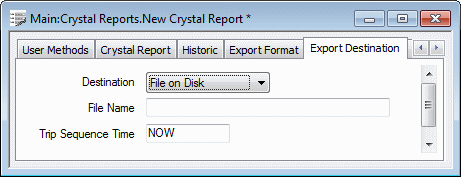
You can export a report to disk automatically. You can use this feature to provide long-term offline storage of reports on a variety of devices, including removable hard disks, CD-Rs, CD-RWs, DVD-Rs, and DVD-RAM, depending on your system hardware.
If you are using this feature to store reports on removable media, the media has to be at the required location and available for use. For example, if the report is to be stored on a CD-R, you need to check that a CD-R is in the CD-RW drive of the server before a report is due to be exported.
To allow ClearSCADA to export a report to a file on a disk, you need to specify the File on Disk Destination on the Export Destination tab, and then use the tab to specify these properties:

- File Name—Specify the name of the file to which the report is to be exported, including the full path to that file. The file name can be local to the main server, or a UNC path to a shared directory on another computer.
You can include trip sequences in the file name, in order to include specific report information—see Trip Sequences Supported by ClearSCADA. Use the Trip Sequence Time field to specify the date/time information that is to be included in any Date or Time trip sequences.
Example:
E:\Monthly Reports\%DMMM yyyy%\AreaA_Report.pdf
to export a report to a directory that indicates the month and year in which the export takes place. For example:
E:\Monthly Reports\Feb 2005\AreaA_Report.pdf
If you exclude the file extension, ClearSCADA will automatically add an extension appropriate to the format in which the file is being exported, when you save the configuration.
To export a report successfully, the server’s printing user has to have write access to the specified location. If the File Name field is used to specify a UNC path (such as \\Server\Monthly_Reports\AreaA_Report_%DyyMM%.pdf), the printing user has to have write access to the specified share and underlying folder. The printing user is the user that is specified in the Printing section of the ClearSCADA Server Configuration Tool (see Printer Settings in the ClearSCADA Guide to Server Administration).
- Trip Sequence Time—Use to specify the time or date that ClearSCADA uses for any Date or Time trip sequences that are specified in the File Name field, above. Enter the time in the OPC Relative Time Format. (The default of NOW results in a time stamp based on ‘now’ exactly.)
For information on using this field, in conjunction with trip sequences, to produce the required date/time settings, see Specify the Trip Sequence Time.