The properties described in this topic apply both to User Forms and User Pattern Forms. (User Patterns only apply to systems on which ClearSCADA can create new User accounts automatically as part of an External Authentication process. For more information, see Create User Accounts from a User Pattern.)
You can use User Groups to allocate security permissions to multiple users—rather than allocate the same permissions to each of those users individually, you can allocate the permissions to a User Group and then associate the relevant Users with that User Group. This results in the same security permissions being applied to every member of that User Group.
When a user logs on via a user account that is a 'member' of a User Group, that user is granted:
- The permissions of the ‘Everyone’ User Group
- The permissions of the user account
- The permissions of the User Group(s) of which the user account is a member
- 'Responsibility' for any geographical regions that are assigned to the user account
- 'Responsibility' for any geographical regions that are assigned to the User Group(s) of which the user account is a member
- Access to any Operator Document Stores that are associated with the user account
- Access to any Operator Document Stores that are associated with the User Group(s) of which the user account is a member.
The User Groups have to exist in ClearSCADA before you can associate them with User accounts or User Patterns (see User Groups).
If the User accounts on your system are managed directly in ClearSCADA (rather than remotely using External Authentication), you can choose whether to use User Groups—if you prefer, you can configure each User's security permissions individually. However, we recommend that you use User Groups to reduce the time taken to manage security permissions (for example, due to staff turnover or a change in security requirements).
Your system's configuration affects whether the User Groups field on a User Form is populated automatically each time the user logs on, or whether you need to enter the required User Groups manually.
The User Groups field on a User Form is populated automatically when the following criteria apply:
- The External Authentication feature is enabled at the ClearSCADA server (see Using External Authentication with ClearSCADA)
- The User account is configured to Use External Authentication (see Define whether a User is Associated with a Windows or LDAP User Profile)
- The corresponding Windows or LDAP user is a member of one or more Windows domain groups or LDAP user groups
- User Groups in ClearSCADA are configured to be associated with the above Windows domain groups or LDAP user groups (see Associate a ClearSCADA User Group with a Windows Domain Group or LDAP User Group).
When the above criteria apply, ClearSCADA will populate the User Groups field automatically each time the user logs on, so that the field lists those User Groups that correspond to the Windows or LDAP user groups of which the User is a member.
If your database contains a mixture of User Groups that are, and are not, associated with Windows domain groups or LDAP user groups, you have to manage the latter manually in ClearSCADA. This means that you have to add or remove the latter User Groups from the relevant Users' configuration Forms whenever membership of those User Groups changes. ClearSCADA only populates the User Groups field on User Forms automatically with those User Groups that are associated with Windows domain groups or LDAP user groups.
On systems on which ClearSCADA can create new User accounts automatically (when triggered to do so at log on), you define the User Groups to which the new User accounts will initially be a member using the User Groups field on the User Pattern Form. Once the User accounts exist in ClearSCADA, whenever the users log back on, ClearSCADA will automatically update the entries in User Groups field on the relevant User Forms to align with any change in User Group membership. (This automatic update of the entries in the User Group field only applies to User Groups on which the Windows/LDAP Group Name field is populated (see Associate a ClearSCADA User Group with a Windows Domain Group or LDAP User Group).) As such, the users' security permissions update automatically in relation to the User Groups of which those users are a member when they log on to ClearSCADA.
You have to populate the User Groups field on User Forms manually:
- On systems that do not use External Authentication
- For those User Groups that are not associated with Windows domain groups or LDAP user groups (regardless of whether other User Groups in ClearSCADA are associated with Windows domain groups or LDAP user groups).
To manually associate or disassociate a user account with a User Group:
-
Either:
- Display the relevant User Form (to define the settings that apply to an individual User account).
- Display the relevant User Pattern Form (if applicable to your system, to define the settings that ClearSCADA is to apply to new User accounts that it might be triggered to create automatically at logon.)
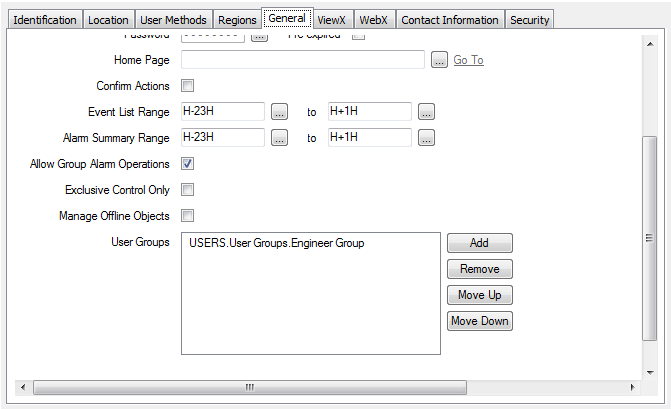
- Select the General tab.
- Use the User Groups field to associate or disassociate the user account with one or more User Groups as required.

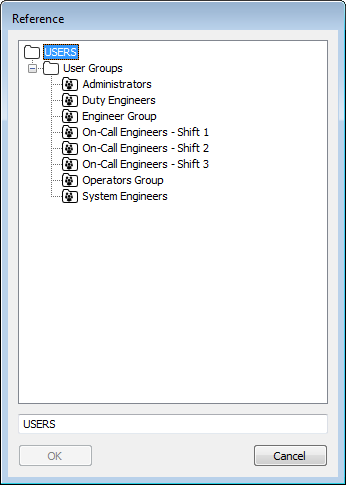
- Select the Add button to add a User Group.
A Reference browse window is displayed. Use the window to locate and select the required User Group.
When you add a User Group, it is shown in the User Groups field. You can add further User Groups by using the Add button again.
If required, use the Move Up or Move Down buttons to adjust the order of the entries in the User Groups field. To do this, select the required entry in the field and then select the relevant button. Repeat for any other entries that you want to reorder.
(The order in which the entries appear in the User Groups field is irrelevant to ClearSCADA; the buttons are provided in case you wish to rearrange the entries to suit your own preferences.)
On User Forms, with those ClearSCADA User Groups that are associated with Windows domain groups or LDAP user groups, the entries will appear at the end of the list in the User Groups field. This is regardless of any manual rearrangement of the entries in the field, and will occur whenever the user logs on to ClearSCADA. (This automatic reordering occurs as part of the Windows/LDAP integration process, although the actual order of the entries in the field is irrelevant to ClearSCADA.)
- If you want to end the User’s membership of a User Group, select the User Group in the User Groups field, and then select the Remove button. The User Group is removed from the User Groups list and is no longer associated with the User.
The User Groups field is an array field, so you can also use other techniques to add and remove User Groups (see Array Field in the ClearSCADA Guide to Core Configuration).
Do not confuse Windows domain groups with Windows groups that only exist on the machine on which the ClearSCADA server is installed (the 'local machine').
If you wish, you can configure ClearSCADA to authenticate an existing ClearSCADA User against a Windows user that only exists on the local machine. However, ClearSCADA will not create a User automatically from a Windows user that only exists on the local machine (it will only do so from a Windows domain user).
Likewise, when performing automatic User Group membership updates ClearSCADA will not consider Windows groups that only exist on the local machine. Any User Groups that are linked to local Windows user groups will be removed from externally authenticated Users during logon.
Although we do not recommend it, you can configure a User so that it is a ‘stand-alone’ User without membership to any User Group (providing that the User account is maintained directly in ClearSCADA, rather than remotely via External Authentication). To do this, you should make sure that the User Groups field on the User Form is empty. (You can disassociate a User from a User Group by using the Remove button). For information on allocating security permissions to a ‘stand alone’ User, see Allocating Permissions to a User Group or User Account.
- Select the Add button to add a User Group.