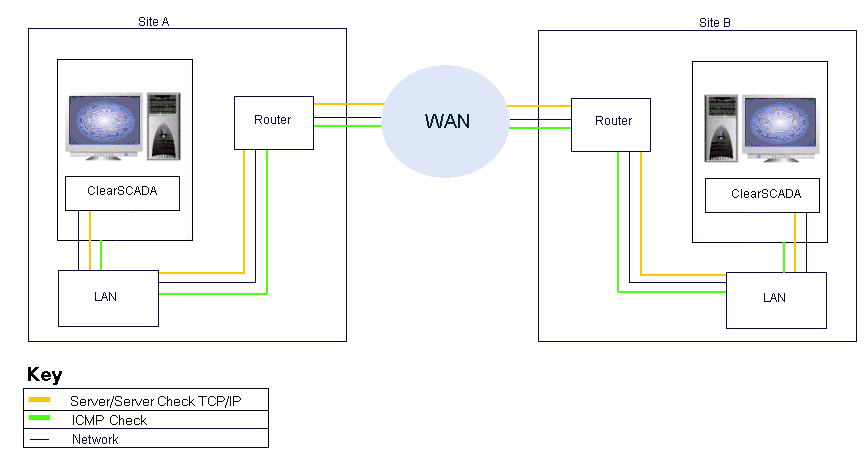
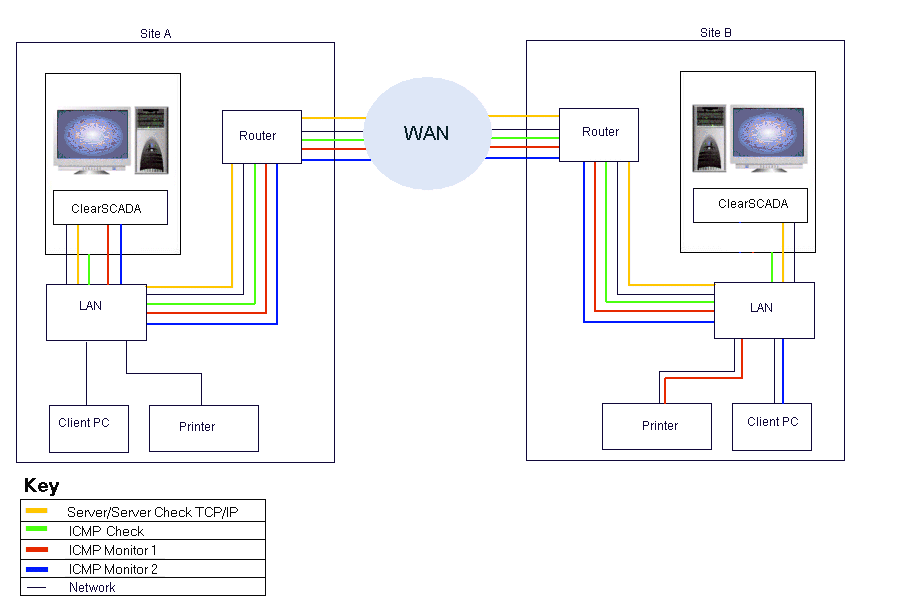
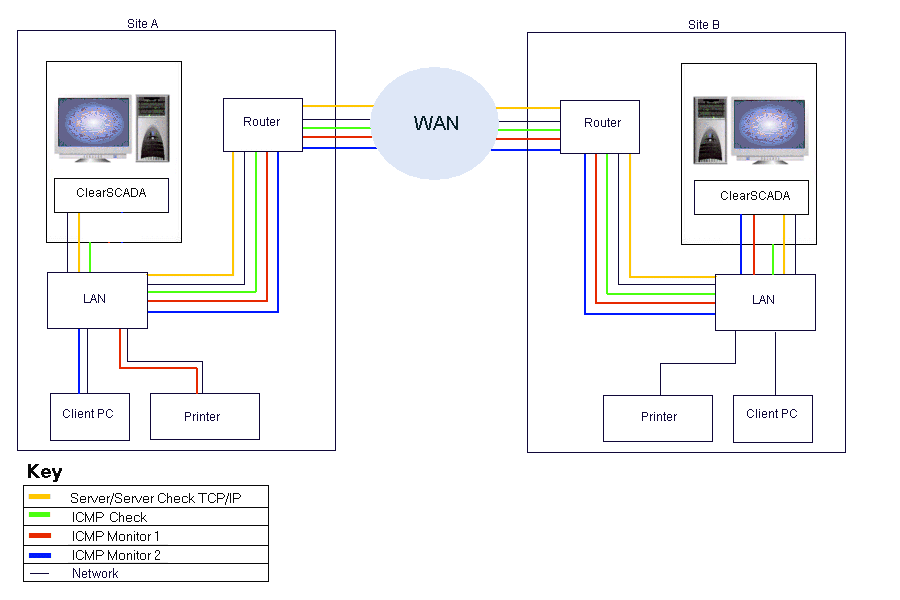
Each ClearSCADA server in a multi-server architecture performs checks on the other servers in the architecture. By default, each server performs two checks:
- A ClearSCADA server to ClearSCADA server check via TCP/IP. This check is designed to test the status of the ClearSCADA software in each of the servers in the architecture. If this check returns a ‘healthy’ result, it indicates that the server software is working correctly and that the network between the servers is operational.
- A ClearSCADA server to Server hardware check via ICMP. This check is designed to test the status of the server components.
-

These default checks are used by ClearSCADA to detect problems with the servers and the network connection between the servers. However, you can also configure ClearSCADA to perform up to three additional ICMP checks on ICMP compatible devices that are connected to the network, such as client PCs, printers and routers. These extra checks are useful as they can also be used to provide confirmation of a network failure.
The diagram below shows a server on one side of a WAN (Site A) monitoring the server on the other side (Site B).

The server at Site B also performs the same checks on the server at Site A.

To configure the additional ICMP Monitor checks for a server:
- Access the System Configuration>Partners settings on the Server Configuration Tool.
- In the ICMP Monitor 1, ICMP Monitor 2 and ICMP Monitor 3 fields, enter the IP Addresses of the devices that are to be tested by the additional ICMP Monitor checks. For example, if you are configuring a server to perform an additional ICMP monitor check on a client and a router, you would enter the IP address of the client in the ICMP Monitor 1 field and the IP address of the router in the ICMP Monitor 2 field.
- If the server has a back up connection (uses dual ethernet connections), enter the IP addresses for the devices in the corresponding ICMP Monitor fields in the Backup Connection section.
- Right-click on the system icon in the hierarchy on the Server Configuration Tool, and then select the Apply Changes option. The ICMP settings you have made are now in place.
During normal conditions, the servers will run the TCP/IP server-server and ICMP checks continuously and return ‘healthy’ results.
If the TCP/IP check returns a ‘failed’ result, the servers use the ICMP checks to determine the reason for the TCP/IP failure:
- If all of the ICMP checks return ‘failed’ results, it indicates that the network between the servers has failed. The server that is Main at that time will continue to run as the Main server. The server that is Standby will use its Action on Isolated setting to determine what action should be taken (see Define what Action Should be Taken when a Server Becomes Isolated).
- If some, but not all, ICMP checks fail, it means that the network between the servers is operational (as at least one ICMP check was successful). The failed ICMP checks indicate that a server has failed, possibly due to:
- hardware failure, such as a failed component in the server
- software failure, for example, an operating system error
- human error, for example, if a server has been shut down manually by mistake.
- In this situation, if the healthy server (the server that has not failed) is the Standby server, it will switch to Main. If the healthy server is the Main server, it will continue as the Main server.