ATTENTION: This section and associated topics apply to the Original WebX client only.
We recommend that you purchase a trusted certificate from a Certification Authority. A trusted certificate will use more sophisticated encryption and provide your system with greater security than a non-trusted certificate.
The certificates must be in PEM or DER format.
To use a trusted certificate with Geo SCADA Expert and Original WebX clients:
- Display the Server Configuration Tool and log on if required.
- Expand the System Configuration branch of the tree-structure.
- Select WebX to display the WebX section.
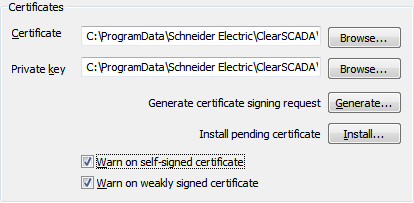
- Select the Certificates section:

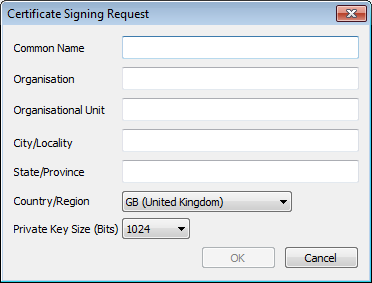
- In the Certificates section, select the Generate button to display the Certificate Signing Request window.

- Enter the requested information:
- Common Name—The node name of the Web server.
- Organization—The name of the business you represent or work for.
- Organization Unit—The department in which you work.
- City/Locality—The name of the city or town where the organization is based.
- State/Province—The area of the country where the organization is based.
- Country/Region—The country or region where the organization is based. Select the country from the combo-list.
- Select the OK button to confirm your entries and display a save as window.
- Use the Save As window to define the name and location of the certificate request file that is generated.
- Select the OK button to confirm the name and location and to generate and save the request file.
When you save the request file (which is a plain text file), Geo SCADA Expert creates a Pending.key file for that request. The Pending.key file contains specific information that pairs it with that specific request file, and must be in place when you later install the certificate. For this reason, it is important that you do not select the Generate button again, prior to installing the certificate (as this will create a new Pending.key file that does not match the request file). - Using Windows Explorer, locate the Pending.key file. It is stored in the same directory as the currently installed certificate (which is in Program Data\Schneider Electric\ClearSCADA\Certificates by default (see File Locations (Default))).
- Make a copy of the Pending.key file and store it in a different folder, for example, in 'My Documents'. This copy is a useful backup, should the Pending.key file be overwritten by you, or another user, selecting the Generate button again (before you have installed the certificate for the existing Pending.key file).
- Locate the ClearSCADA.cer key file and make a copy of it. The ClearSCADA.cer file is your existing key, and will be replaced by a new key. We advise you to make a copy of your existing key, in case you want to restore it at a later date.
- Send the request file to a Certification Authority. You can e-mail the file or may be able to send it by other means, for example, upload it via the Internet or send it via a postal service.
When you have sent the file, the Certification Authority will respond by sending you a verified certificate file. The certificate must be in PEM or DER format.
Depending on the provider you use, you will receive:
- A single certificate file (a .cer file). This is the type of file Geo SCADA Expert requires.
- Multiple certificate files
- The certificate as an email
If you receive multiple certificate files or an email certificate, you will need to copy the certificate information into a text file. For example, if you receive 3 certificate files, open each of the files, and then copy and paste their content into a single text file (you can use Notepad or a similar text editor). When you have the certificate content in a single text file, save the file with a .cer extension, for example,
cert2020.cer. - In the WebX settings on the Server Configuration Tool, select the Install button to display the Select Certificate dialog box.
- Browse to either:
- The certificate file that you have received from the Certification Authority
- The certificate file that you created in step 9.
- Select the OK button to install the certificate.
If the certificate information matches the ClearSCADA.key or Pending.key files, the certificate is installed. If it matched the Pending.Key file, the Pending.key file is renamed to ClearSCADA.key and the old ClearSCADA.key is deleted.
The Secure Socket Layers (SSL) will use the:
- Certificate file to detect that the connection is an authorized and secure connection
- ClearSCADA key file for encrypting and decrypting data between the Web server and the Original WebX clients.
If the certificate information does not match the ClearSCADA.key or Pending.key files, the certificate is not installed. The previous certificate remains in place (this may be the default certificate or another certificate that was previously installed).
Now that you have defined the Certificates settings, you can proceed with the configuration of the other WebX settings or you can right-click on the server icon and select the Apply Changes option to implement the changes.