If required, you can change the order of, or resize, any of the columns on the Alarms Lists on a ViewX or WebX client, or the Alarm Banner on a ViewX client. Any changes that you make are on a per-client basis and affect either the Alarms Lists, or the Alarm Banner (depending from which of these two items you opt to make the changes). For example, if you change the order of the columns on the Alarm Banner on a ViewX client, those changes will only affect the Alarm Banner on that particular client. Similarly, if you resize a column on an Alarms List on a WebX client, those changes will only apply to the Alarms Lists that are displayed on that particular WebX client.
To make any of the above changes:
- On the relevant client, right-click on whichever Alarms display you want to make the changes (either an Alarms List on a ViewX or WebX client, or the Alarm Banner on a ViewX client).
A context-sensitive menu is displayed. - Select the Columns option.
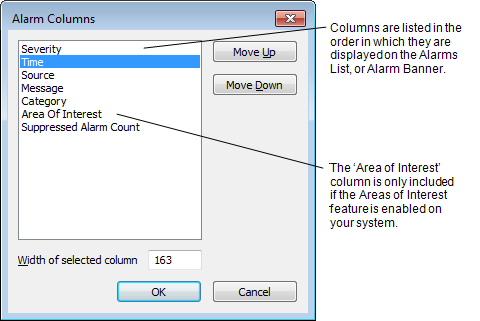
The Alarm Columns window is displayed.
The window lists the columns that are included on the Alarms List or Alarm Banner. The entries are listed in the order in which the columns are displayed (the list also includes any columns that are hidden due to their size being set to 0).
Severity, Time, Source, Message, and Category columns are included by default (along with the ‘Area of Interest’ column, if the Area of Interest feature is enabled on your system). It is also possible to add additional columns to the Alarms Lists and Alarm Banner—if such columns have been added to the alarm displays on your system, these will also be listed in the Alarm Columns window.
- To change the order of any of the columns:
- Select the column that you want to move.
- Either:
- Select the Move Up button to move the column further up the list.
Or:
- Select the Move Down button to move the column further down the list.
- Repeat the above steps for any other columns for which you want to change the order.
- To resize a column:
- Select the column that you want to resize.
Its present width is displayed in the Width of selected column field. - Specify the required width in the Width of selected column field.
- To hide an existing column, so that it is not displayed, specify a width of 0 (zero).
- To display a presently hidden column, set its width to a non-zero value.
- Repeat the above steps for any other columns that you want to resize.
- Select the column that you want to resize.
- Select the OK button to confirm the changes and close the Alarm Columns window.
The changes are applied to the Alarms List or Alarms Banner, as applicable.