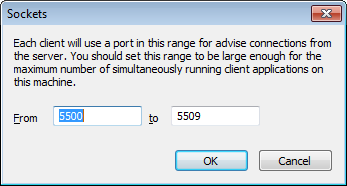
In this section, we explain how to use the Sockets window to change the range of ports for the ViewX client’s incoming data. If you need to change the range of ports for a third-party OPC or third-party ODBC client, you can use the Sockets window settings in exactly the same way as described here.
You can use the ClearSCADA Client applet to change the range of ports that can be used for the client’s incoming data (one of the ports in the range will be used to receive data via the server advise connection). By default, the range of ports is 5500 to 5509 inclusive which allows a maximum of ten client applications per client machine.
You may need to change this range if the ports 5500 to 5509 are already allocated to other applications or you need to increase or reduce the number of client applications permitted on the client.
To change the range of ports that can be used for the client’s incoming data:
- On the client PC, Display the ClearSCADA Client Applet
- Select the system that has the connection for which you want to alter the port settings.
- Select the Sockets button to display the Sockets window.

- Enter the new port range (lowest port number in the left-hand field, highest port number in the right-hand field).
- Select the OK button to confirm your selection and close the Sockets window.
Remember that if you are using a firewall between the client and server, you will need to configure the firewall to allow the server to send data to the client via the ports in the defined range.
Further Information