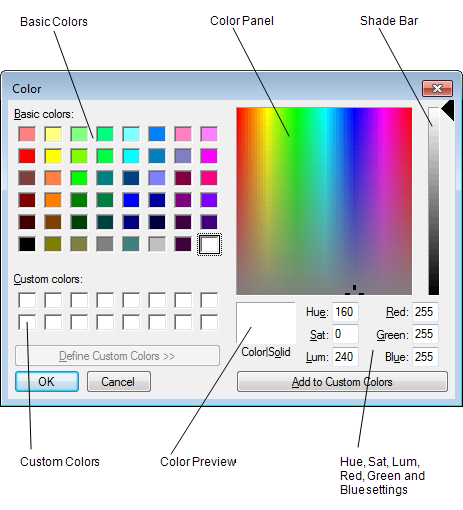
The Color window is displayed whenever you choose the custom option (...) on a color button's palette. You can use the Color window to add a custom color to the color palette.

To create a custom color:
- Select a blank check box in the Custom Colors section (bottom left-hand side of the window). If there are no blank check boxes, you will have to overwrite an existing custom color—select the check box for the color you want to replace.
- In the Basic Colors section, select the color that is closest to the color that you want to create. For example, if you want to create a light shade of brown, select a basic brown color.
When you select a basic color, its values are shown in the Hue, Sat, Lum, Red, Green, and Blue fields. The cursor on the color panel is positioned on the selected color automatically, and the shade bar shows different shades of the selected color.
- Adjust the color by:
- Entering new values in the Hue, Sat, and Lum fields or the Red, Green, and Blue fields. These fields define the hue, saturation, luminescence, and the amount of red, green, and blue in the color respectively.
- Selecting a different color in the Color Panel
- Moving the arrow next to the Shade Bar to select a lighter or darker shade of the selected color.
You can see the color you have created in the Color Preview box.
- When you have created the required color, select the Add to Custom Colors button. The custom color is added to the Custom Colors section.
- Select the check box for the custom color that you want to use.
- Select the OK button to confirm you selection and close the Color window. The custom color will now be used as the color for the relevant color button.
