ClearSCADA allows you to trigger system calls (run executable files) via:
- Logic programs (using the SYSTEM function)
- Alarm Redirections (using the System Command action)
- The Execute action (when performed on a System Command database item).
System calls are reliant on Windows® user accounts—they can only be performed if the Windows® user account used by the server has Read permissions for the executable files that are triggered by the system calls. The ClearSCADA server runs under the Windows® user account named System. Although this is a high level user account, it does not provide permissions for network access or printer configuration. This means that you cannot use a system call to access another PC or a printer when the server is configured to use the System Windows® user account. To resolve this, you can use the ClearSCADA Server Configuration Tool's System Calls settings to define another Windows® user account for system calls. By associating the server's system calls with a different Windows® user account (one with printer configuration permissions and network access permissions), you can setup ClearSCADA so that common system calls such as print are available.
To configure the System Calls settings on your server:
- Use Microsoft Windows® to create a new Windows® user account that has the privileges you require (printer configuration, network access etc.) You will need to define a Username, Password, and Domain. For more information, please refer to the documentation supplied with your operating system.
- Access the ClearSCADA Server Configuration Tool (see Accessing the ClearSCADA Server Configuration Tool).
- Expand the System Configuration branch.
- Select System Calls.

-
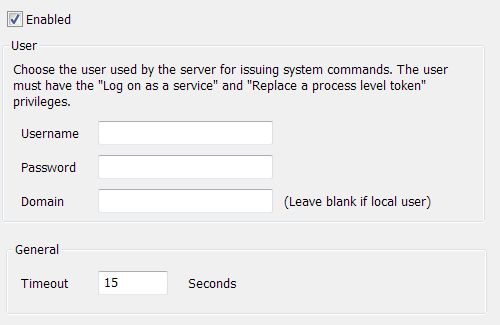
Select the Enabled check box to enable system calls. You must now enter the details of the Microsoft Windows® user that you want to use for issuing system calls. Clear the check box if you want to disable system calls (they are disabled by default).
- Enter the Username, Password, and Domain for the Microsoft Windows® user in the appropriate fields. You cannot leave these fields blank.
NOTE: ClearSCADA stores username and password information in the registry for use with features such as e-mail, alarm redirection, and system commands. Such information is encrypted using machine details to prevent the encrypted data from being imported onto other machines. Encrypted registry data is intended only to be decrypted by the server that encrypted the data. If you load backup registry files that include encrypted data onto a different server, you will have to re-enter the user data. This is also true if Windows® is re-installed on the machine on which the data was encrypted.
- In the General section, use the Timeout field to enter the amount of time to allow for the Windows® process triggered by a system call to complete. If the process has not completed when the defined time period elapses, ClearSCADA will end the process. Typically, the default setting of 15 seconds is appropriate. You may need to extend this amount if you know that a particular system command takes longer than 15 seconds to complete.
- Close the ClearSCADA Server Configuration Tool to apply the changes (or select another branch if further server configuration is required).
ATTENTION: Do not use system calls to call interactive processes, such as running interactive programs like Microsoft® Notepad®. The ClearSCADA server runs as a Windows service and therefore an interactive process will not be visible on the Windows desktop. Consequently, the process will run until the Timeout period has elapsed, or a user ends the process (for example, by using Task Manager).
You can use the Server Status Tool to view the current status of system calls—see Latest System Calls in the ClearSCADA Guide to the Server Status Tool and see Queued System Calls in the ClearSCADA Guide to the Server Status Tool.
Now that you have set the System Calls settings, you can proceed with the ClearSCADA Server configuration—see WebX Server Settings.