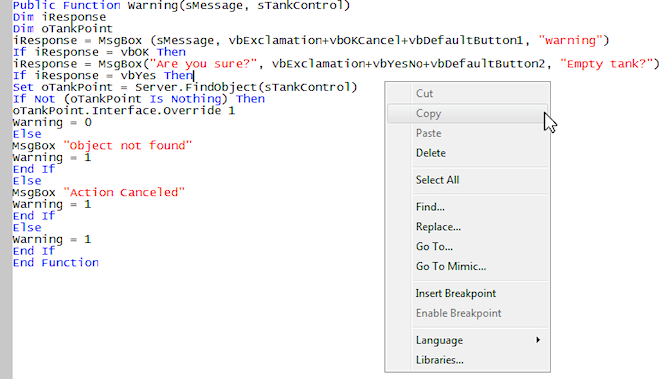
When you are editing your script, you can use the script context sensitive menu to access some useful features. To display the context sensitive menu, position the cursor on the background of the Script Editor display and then click the right-hand mouse button.

The context sensitive menu contains these useful options:
- Cut—Use to remove selected code and store it in your PC’s clipboard area.
- Copy—Use to copy the selected code and store the copy in your PC’s clipboard area.
- Paste—Use to insert the contents of your PC’s clipboard area into the code at the selected insertion point.
- Delete—Use to remove the selected code. The removed code is not stored in the clipboard area.
- Select All—Use to select all of the code in the Script Editor display.
- Find—Use to display a Find window. You can use the Find window to locate specified characters in the code. To do this, enter the characters you want to search for in the Find what field, and make a choice for the following settings:
- Match Whole Word Only—Select this check box if you want Geo SCADA Expert to only search for complete instances of the Find what entry. For example, if you enter A=1 in the Find what field and select the Match Whole Word Only check box, Geo SCADA Expert will only find A=1 where A=1 appears as its own separate entity in the code. Geo SCADA Expert will not find A=1 where A=1 is part of a longer string of characters, for example, Geo SCADA Expert would not find the A=1 in ‘CDA=1’.
If you want Geo SCADA Expert to find every instance of the Find what entry, irrespective of whether they appear as part of a longer entry, clear the Match Whole Word Only check box.
- Match Case—Select this check box if you want Geo SCADA Expert’s search for the Find what entry to be case sensitive; clear the check box if you want Geo SCADA Expert to ignore the case.
- Direction—Use to determine whether Geo SCADA Expert searches from the top of the code to the bottom (Down) or from the bottom of the code to the top (Up).
When you have made your choices, select the Find Next button to locate the next instance of the Find what entry in the code. Continue to select the Find Next button to proceed to the next instance of the Find what entry as required.
- Match Whole Word Only—Select this check box if you want Geo SCADA Expert to only search for complete instances of the Find what entry. For example, if you enter A=1 in the Find what field and select the Match Whole Word Only check box, Geo SCADA Expert will only find A=1 where A=1 appears as its own separate entity in the code. Geo SCADA Expert will not find A=1 where A=1 is part of a longer string of characters, for example, Geo SCADA Expert would not find the A=1 in ‘CDA=1’.
- Replace—Use to display a Replace window which you can use to find and replace characters in your code. The Replace window works in a similar way to the Find window, except that it has these additional settings:
- Replace with—Enter the text that will be used in place of the Find what entry. When Geo SCADA Expert locates an instance of the Find what entry in the code, you have the choice of replacing it with the entry in the Replace with field.
- Replace In—Choose to replace only in a selected part of the code (Selection) or the whole code (Whole File). You can only choose Selection if you have highlighted a portion of the code.
- Replace—Select this button to confirm that you want to replace the instance of the Find what term that Geo SCADA Expert has located with the defined Replace with term.
- Replace All—Select this button if you want Geo SCADA Expert to replace every instance of the Find what term with the term defined in the Replace with field.
The Replace window does not have Direction settings.
- Go To—Use to display the Go To Line window. You can use the Go To Line window to set Geo SCADA Expert to move the cursor to a specific line in the code. To do this, simply enter the required line number in the Line Number field, then select the OK button.
- Go To Mimic—Use to display the Mimic associated with the Mimic script.
- Insert Breakpoint—Use to add a breakpoint to the code. This is the same as inserting a breakpoint using the Breakpoints commands group on the Script tab of the ViewX ribbon (see Debug Mode).
- Remove Breakpoint—Use to delete a breakpoint. This is only available if there is a breakpoint in the script. For more information, see Debug Mode.
- Disable Breakpoint—Use to disable a breakpoint. The breakpoint remains in the script but is ignored. This option is only available if there is a breakpoint in the script (see Debug Mode).
- Enable Breakpoint—Use to enable a breakpoint that is currently disabled. This option is only available if there is a disabled breakpoint in the script (see Debug Mode).
- Language—Use to select the language of the active script. The submenu includes a list of available language options.
- Libraries—Use to reference a script library (see Reference a Script Library in a Script).
Further Information
A different set of menu options are available when a script's context-sensitive menu is accessed in Debug Mode.