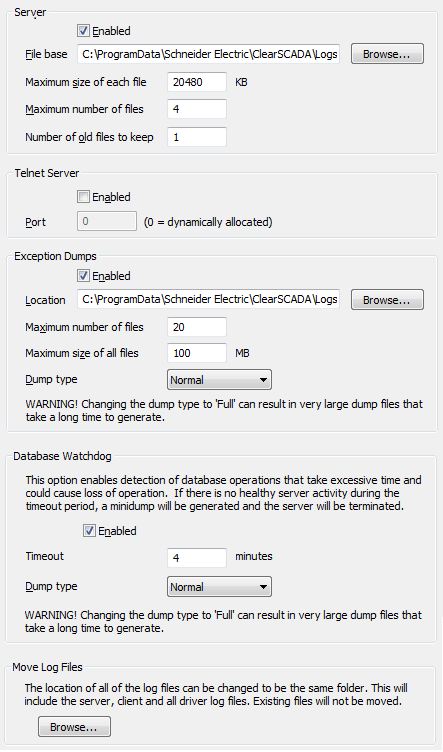
To define the server logging settings:
- Access the Geo SCADA Expert Server Configuration Tool.
- Expand the System Configuration branch of the tree-structure.
- Select the Logging option to display the Logging section.

- In the Server section, define these settings:
- Enabled—Select the Enabled check box to enable server logging, or clear the Enabled check box to disable server logging.
We recommend that you enable the server logging feature so that there are records of any errors. You can use the Server Status Tool to control the contents of the server log files—this can limit the load caused by the logging (see Filter the Content of the Server Log Files).
- File Base—Use the File Base field to define the folder that will contain the server log files and the filename prefix for the files. The prefix is the name of the files (it cannot contain certain characters, see your operating system documentation for more details).
By default the prefix for server log files is DB. The name of each log file comprises the prefix followed by an underscore and a file number.
Either:
- Type in the path and prefix
Or:
- Use the browse button to locate the required folder, and then type the prefix at the end of the path, for example, C:\TEMP\Serverlog
- Type in the path and prefix
- Maximum size of each file—Use this field to define the largest size of each server log file. The size is in kilobytes.
The default on new installations is 20480KB (20MB).
The actual file size is likely to exceed the size that is specified in this field. This is because the server completes writing the full line of log entries before the file size is checked.
By limiting the size of individual log files, you can set Geo SCADA Expert to only create log files that are a manageable size. For example, you can set the file size limit so that the files are a suitable size for viewing in Notepad and sending via e-mail.
- Maximum number of files—Use to define the largest number of server log files that will be retained. When a new file is created, the oldest file is deleted.
The default on new installations is 4.
Example:
The maximum number of files is set to 4. The system has 4 log files: db_001.log to db_004.log.
When the db_004.log file exceeds its size limit, a new file is generated. The oldest log file (db_001.log) is deleted to make room for the new file. The new file is named db_005.log.
When setting the Maximum number of files, you need to consider the amount of storage space that is available and the potential size of each log file. You should also consider how quickly the size of the log files is increasing, for example, if you have four 20480KB (20MB) files and data is logging 100K per minute, the log files will only contain 13 hours and 39 minutes' worth of information (with each file covering just under 3 hours and 25 minutes).
- Number of old files to keep—Use this field to define the number of sets of log files that can be stored.
Each time the server is started, the existing set of log files are renamed so that a new set of log files can be stored. The Number of old files to keep setting defines how many sets of log files the server can store. If the number of log file sets reaches the defined amount, any new sets of log files will use the space occupied by the oldest existing log files (the oldest sets of files are deleted). The existing files are renamed.
Example:
The number of old files to keep is set to 2. The server stores 3 log files:
DB_001.log (current)
DB_001.log_2 (previous)
DB_001.log_3 (one before previous)
The server is restarted and so a new log file needs to be created.
The server deletes the oldest file (DB_001.log_3) and renames the existing files:
DB_001.log is renamed so that it becomes DB_001.log_2.
DB_001.log_2 is renamed so that it becomes DB_001.log_3.
The new log file is stored as DB_001.log.
You should consider the amount of storage space that is available before you define the number of old files that are retained. You should also consider how often the server is restarted. For many systems, the default setting of 1 is adequate.
- Telnet Port—Use this field to define the TCP/IP port for the server's Telnet server (see Telnet Monitoring).
If you use a fixed port for the Telnet server, you should enter the number of the port. You should use 'registered ports' in the range 1024 to 49151 inclusive (for more information, see http://www.iana.org/assignments/port-numbers).
If there is no port number specified (that is, it has the default setting of 0), the operating system will allocate a new port each time the server is restarted—you will need to determine which port the operating system has allocated each time you need to monitor the server. You can view the port numbers that have been allocated by the operating system by examining the General/Information display of the Geo SCADA Expert Server Status Tool (or Diagnostics web page on the web interface).
You also need to specify a Telnet Port when a firewall is being used—you need to specify the port so that it can be opened on the firewall.
For more information on Telnet, see Telnet Monitoring.
- Enabled—Select the Enabled check box to enable server logging, or clear the Enabled check box to disable server logging.
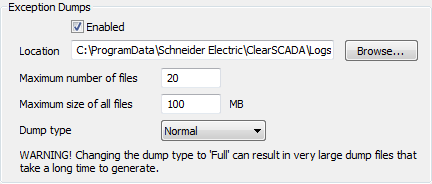
- In the Exception Dumps section, define these settings:

- Enabled—Select the Enabled check box to activate the exception dumps feature (or clear it if you want to disable the feature). The exception dumps feature will be activated/deactivated on the Geo SCADA Expert applications that are running on the server, including drivers.
The exception dumps feature allows diagnostic files to be created when there is an exception (application error). We recommend that you enable the exception dumps feature.
- Location—Use the browse button next to the Location field to specify the folder that will contain the exception dump files.
- Maximum Number of Files—Enter the maximum number of exception dump files that can be stored in the defined location. If the number of exception dumps exceeds the defined limit, the oldest exception dumps are deleted to make space for the new exception dumps.
We recommend that you use the default setting of 20 unless you are specifically advised to change the setting by Schneider Electric staff.
- Maximum Size of All Files—Enter the maximum amount of disk space that can be used to store the exception dump files. If the exception dumps exceed the defined limit, the oldest exception dumps are deleted to make space for the new exception dumps.
We recommend that you use the default setting of 100 MB unless you are specifically advised to change the setting by Schneider Electric staff.
- Dump Type—Choose the amount of data that is included in the exception dumps. You can choose between Normal and Full. We recommend that you set the Dump Type to Normal unless specifically advised to change the setting to Full by Schneider Electric staff. The Full setting can create large dump files that can take a considerable amount of time to generate.
- Enabled—Select the Enabled check box to activate the exception dumps feature (or clear it if you want to disable the feature). The exception dumps feature will be activated/deactivated on the Geo SCADA Expert applications that are running on the server, including drivers.
- Use the fields in the Database Watchdog section to specify whether to use a watchdog to stop a frozen server once a timeout has been exceeded, and generate a minidump file for analysis (see Configure the Database Watchdog Settings).
- You can use the Move Log Files wizard to change the location of all of the log files on a server at once. This includes server logs, driver logs, and so on, and only applies to new log files—the Move Log Files wizard does not move existing files. This will save you time if you need to every log file, for example, if you are moving the log files to another disk.
If you want to move the new log files into a new location, use the Browse button to select the required location. New log files will be stored in the specified location. Any existing files will not be moved. If you want to move the existing files to a new location, you will need to stop the server then use Windows Explorer to relocate the files.
If you do want to leave the new log files in their current location, ignore the Move Log Files wizard and proceed to the next step. The new log files will be stored in the default locations or the locations that are already configured.
- Apply the changes to the server.