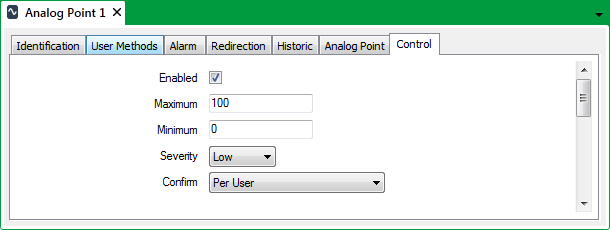
Use the fields at the top of the Control tab to define the range of values that an operator can send to control the plant, and the severity of any events and alarms that are associated with the control action:

- Points on simple drivers that support controls, and output points on some advanced drivers, include an Enabled check box at the top of the Control tab. If a point is set up as an output point and is to be controlled by ClearSCADA, select the check box to enable the control feature for that point.
Other fields on the Control tab become available for use.Clear the Enabled check box if the point is not to be used as an output point, or if the point is to be controlled by another application, rather than ClearSCADA.
The other fields on the Control tab will be ‘grayed out’ and unavailable for use.
Go to step 8. - In the Maximum field specify the highest output value that can be sent to control the plant.
- In the Minimum field specify the lowest output value that can be sent to control the plant.
An operator, for example, would define the actual control value using the field in the Control window, displayed when the Control pick action is selected. The value has to fall within the limits specified above. The value is converted from an engineering value into a raw value when the server sends the control.
- Use the Severity combo box to define the severity of the event that is logged for each successful control action, and the severity of the alarm raised for an unsuccessful control action. For more information, see Defining Severities.
- If the Area of Interest feature is enabled on your system, an additional Area of Interest field is displayed on the Control tab. Use the field to specify the Area of Interest with which any control-related events and alarms are associated.

For more information on configuring Areas of Interest, see Assign a Different Area of Interest to an Item’s Alarms and Events in the ClearSCADA Guide to Core Configuration.
For information on the Area of Interest feature, see Restrict Alarm and Event Access to Specific Areas of Interest in the ClearSCADA Guide to Core Configuration.
- Use the Confirm combo box to define whether a confirmation dialog box is displayed whenever an operator attempts to send a control (see Requesting Confirmation of Action Requests).
- If available for points on your drivers, use the fields in the Promote section of the Control tab to define whether any outstations are scanned in preference to others following a control request (see Promoting Scanning of Outstations Associated with Controls).
- If available for points on your drivers, use the Update Point on Successful Action check box to specify whether ClearSCADA is to Update an Output Point's Value Immediately Following a Successful Control Action.
- Save the configuration.