In many cases, you will probably only access one ClearSCADA database table per report. However, with more complex reports, such as reports that query historic table(s), you may want to access more than one database table per report. In such cases, you need to specify the relationship between those tables.
In order to link the records in one table with the records in another table, you need to specify which table properties the Crystal Reports application is to use to match both sets of records. (To include data from unrelated tables, consider whether to Use a Subreport to Include Unrelated Data in the Same Report, a ClearSCADA Data Grid, or a ClearSCADA Data Table (see Custom Tables and Fields).)
We advise that you only use Id numbers for linking database tables in reports and not for any means of filtering, sorting, or otherwise restricting the report content.
- View your report on the Design tab of the Crystal Reports application.
- Use the Database menu to display the Database Expert window (for information on accessing this window, see Connect to the ClearSCADA Database).
- Select the Links tab.
The tables that have been specified for the report are shown, with suggested or existing link(s). - Adjust the link(s) between the tables, as necessary.
If the suggested link(s) are incorrect, use the Clear Links or Delete Link buttons to clear the links, then either select an Auto-Link and select the Link button, or manually create a link by dragging from a field in one table over to the required field in another table.
You can only link fields that are ‘keys’ which appear in both tables. Typical ‘keys’ that you can use to link ClearSCADA database tables include the Id and FullName fields. For more information on creating and removing links, see the documentation supplied with the Crystal Reports application.
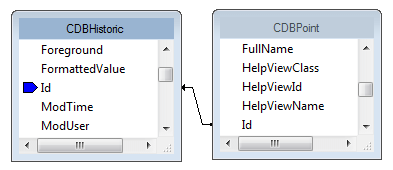
Example:
In a report that queries both the CDBHistoric and CDBPoint tables, you would choose to link the tables by Id.

(Colored ‘Index Legend’ symbols (shown as a blue symbol in the above example) indicate the keys that exist in each table—you typically only link those key fields that appear in both tables.)
- Select the OK button to confirm the changes.
The Database Expert window is closed.