You can animate the Filter property of an embedded Alarms List so that a filter is applied to the Alarms List. This creates a criteria for the Alarms List so that it can only display those alarms that are a specific category, state, or belong to specific items or are in a defined severity range (see Filter an Embedded Alarms List).
To animate the Filter property of an embedded Alarms List, you need to use the following syntax:
<filter1>="<value1>"&<filter2>="<value2>"
Where:
- <filter1> is the name of the first filter condition that you want to apply. Do not include the angle brackets < >. You can use any of the following filter conditions:
- Area—Represents a database Group. You can define multiple Areas (separate with ampersands, for example, Area="AreaName1" & Area="AreaName2").
- Source—Represents a database item. You can define multiple Sources (separate with ampersands, for example, Source="Source1" & Source="Source2").
- AOI—Represents an Area of Interest. You can define multiple AOIs (separate with ampersands, for example, AOI="AreaofInterest1" & AOI="AreaofInterest2").
- MinSeverity—Represents the minimum severity for a severity range. The MinSeverity has to be used in conjunction with the MaxSeverity; they cannot be used independently. You can define up to 4 pairs of severity values (separate each pair with an ampersand &).
- MaxSeverity—Represents the maximum severity for a severity range. The MaxSeverity has to be used in conjunction with the MinSeverity; they cannot be used independently. You can define up to 4 pairs of severity values (separate each pair with an ampersand &).
- Categories—Represents a list of category names. The categories have to be separated by semi-colons. For example, Categories="Unknown Dial In; Outstation Error; Outstation Hardware". Unlike many of the other filter conditions, Categories can only be defined once.
You can use any of the filter categories. For more information, see Filter Alarms by Alarm Category in the ClearSCADA Guide to Alarms.
- AlarmState—Represents an alarm state. The AlarmState can be set to All, Acknowledged, Cleared, Unacknowledged, Uncleared, or UnacknowledgedUncleared. Unlike many of the other filter conditions, AlarmState can only be defined once.
- <value1>—Represents the criteria that has to be met for the first filter condition. The value has to be enclosed in double quotation marks " ". Do not enter the angle brackets < >.
- &—Use the ampersand character (&) to add another filter condition.
- <filter2>—Represents the second filter. Do not enter the angle brackets < >.
- <value2>—Represents the value for the second filter. The value has to be enclosed in double quotation marks " ". Do not enter the angle brackets < >.
Additional filters and values can be included by using the &. For example, <filter 3>="<value3>"&<filter4>="<value4>" and so on.
As long as the source of the Filter animation is a string value and uses the appropriate syntax, the Alarms List animation will be valid. So you can use registry settings to store different filters for an Alarms List, then use buttons to toggle the filters that are applied.
Further Information
Alarm Filter Syntax: see Alarm Filter String Syntax in the ClearSCADA Guide to Alarms.
Example 1 - Filter by Point, Group, and Severity
The following entry filters the embedded Alarms List so that it only shows alarms for a point named 'AI1' that is stored in a Group named 'Main Site'. The Alarms List only includes alarms that are within the severity range 200-800 (the meaning of these values is defined in the server configuration - see Alarm and Event Severities in the ClearSCADA Guide to Server Administration).
'Area="Main Site"&Source="AI1"&MinSeverity="200"&MaxSeverity="800"'
Example 2 - Apply Different Filters by Selecting a Button
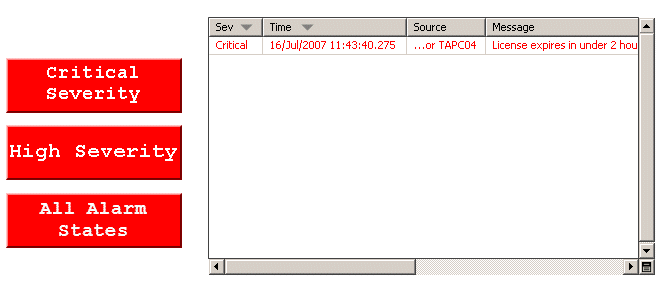
In this example, the Mimic contains an Alarms List that displays alarms of every state by default. The Mimic also contains three buttons: Critical Severity, High Severity, and All Alarm States. These buttons are configured to use registry pick actions so that when selected, they change the filter that is applied to the Alarms List (so that the Alarms List shows only critical alarms, only high alarms, and alarms of every state respectively).
The embedded Alarms List has a Filter animation with this configuration:
REGISTRY('Severity', '')
This sets the Filter property of the Alarms List to use the filter that is contained in the registry setting named Severity. The Severity registry setting is written when one of the Mimic's buttons is selected.
The Mimic's buttons are configured as follows:
- Critical Severity—Configured to have a registry pick action with these settings: Name=Severity, Type=String, Value=MinSeverity="1000"&MaxSeverity="1000".
- High Severity—Configured to have a registry pick action with these settings: Name=Severity, Type=String, Value=MinSeverity="667"&MaxSeverity="999".
- All Alarm States—Configured to have a registry pick action with these settings: Name=Severity, Type=String, Value=MinSeverity="1"&MaxSeverity="1000".
When the Mimic is displayed in Run Mode, the Alarms List will respond to the buttons. When the Critical Severity button is selected, the Severity registry value has the following value written to it: MinSeverity="1000"&MaxSeverity="1000". As the source of the Filter animation for the Alarms List is the Severity registry value, the Alarms List is filtered to show only critical alarms.
Similarly, when the High Severity button is selected, the value MinSeverity="667"&MaxSeverity="999" is written to the Severity registry and so the Alarms List only shows High severity alarms.
When the All Alarm States button is selected, the value MinSeverity="1"&MaxSeverity="1000" is written to the Severity registry and the Alarms List shows alarms of every state.

The registry values are usually stored in theHKEY_CURRENT_USER\Software\Schneider Electric\ClearSCADA\ViewX/Mimics key in the registry on your client PC.