For Original WebX client users a Web User account is available and it is based on the ViewX Guest User account definition.
The Guest User account is not available for WebX clients.
To configure the Guest user account:
- Display the Database Bar (see Display an Explorer Bar).
- Right-click on the Root Group (System icon) in the Database Bar.
A context-sensitive menu is displayed. - Select the Edit Properties option from the menu. (Alternatively, you can select the Properties option for the System from another display, such as a Mimic that contains a context-sensitive menu for the System.)
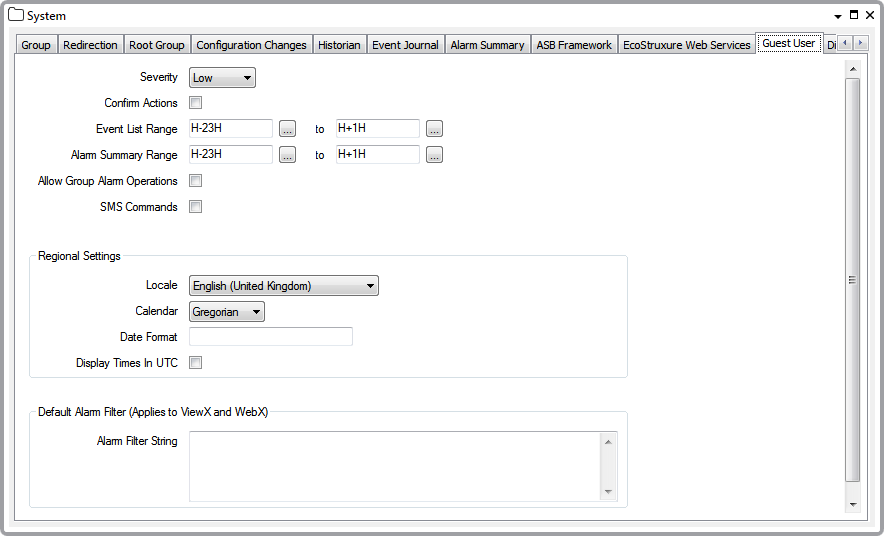
The System Form is displayed. - On the System Form, select the Guest User tab.

- Use the Guest User tab to configure the general Guest user account settings. You will see that the settings are similar to those found on the User Form. The settings on the Guest User tab work in exactly the same way as the corresponding settings on the User Form, except that they apply to the Guest User account and so are the settings that are in place for anyone that accesses the system without logging on.
The settings are:
- Severity—see Define the Severity of Events Associated with a User.
- Confirm Actions—see Enable or Disable the Confirm Actions Feature for a User.
- Event List Range—see Define the Time Range for a User's Events List.
- Alarm Summary Range—Define the Time Range for a User's Alarm Summary List
- Allow Group Alarm Operations—see Define whether the User can Respond to Group Alarms Simultaneously.
- SMS Commands—see Define the E-Mail, Pager, and Voicemail Contact Settings for a User (This setting does not apply to the Web User account).
- Exclusive Control Only—see Define whether a User can Only Work with Items under their Exclusive Control.
- Locale—see Define the Regional Settings for a User.
- Calendar—see Define the Regional Settings for a User.
- Date Format—see Define the Regional Settings for a User. This setting applies to ViewX but has to match the settings defined for the client (see Define the Client Specific Settings for the Guest User).
- Display Times in UTC—see Define the Regional Settings for a User.
- Default Alarm Filter—see Define the Default Alarm Filter Settings for a User.
- Areas of Interest—see Define which Areas of Interest a User can Access.
- After configuring the settings on the Guest User tab, save the Form.
You have now completed the general configuration of the Guest user account (the configuration that applies to the Guest user on every client).
There are additional settings that can be applied to the Guest user account for each client. These settings only apply to the client on which they are set—they have no effect on other clients. To configure these additional settings, proceed with Define the Client Specific Settings for the Guest User.
If you have no need to configure any client-specific settings for the Guest user account, you can proceed to define access permissions. For more information, see Allocating Security Permissions.
If you have created a Guest user account and that user account does not appear to have access to the features for which it has permissions, select the Permission Restrictions settings. Permission Restrictions override other security settings. To access a feature, your user account has to have the relevant permission. Also, that permission should not be restricted by the Permission Restrictions settings at the server (see Permissions for Working with User Accounts and User Groups).
Further Information
Time Zone Settings: see Time Zone Support in ClearSCADA in the ClearSCADA Guide to Core Configuration.