In addition to the default server security settings you can configure the security settings for each user individually. This allows you to override the server default settings on a per-user basis. If you have many similar types of users we recommend you use the server default security settings (see Define the Default Security Settings for New User Accounts).
ATTENTION: This section only applies to User Accounts that are managed directly in ClearSCADA. With User Accounts that are associated with Windows or LDAP User Profiles, password management is performed via the relevant Windows domain or LDAP server.
To define the security settings for a user account that is managed directly in ClearSCADA:
- Display the User Form.
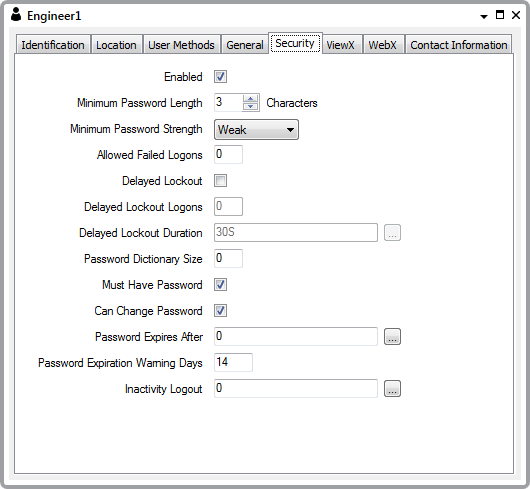
If the default server security settings are set to allow per-user configuration (see Define the Default Security Settings for New User Accounts), the User Form contains a Security tab. This tab is automatically included if the server security is not configured. You can use the Security tab to define security settings for the individual user account, providing that the user account is managed directly in ClearSCADA, rather than via an associated Windows or LDAP User Profile.
- Select the Security tab. This tab is only available if the Allow Per-User Configuration feature is enabled in the server configuration (see Define the Default Security Settings for New User Accounts).

- Define the security settings as follows:
- Enabled—Select this check box to enable the security features for the user account. If you enable the security settings for the User, you will be able to apply specific security settings to the user account you are currently configuring and override the default server security settings.
- Minimum Password Length—Define the least number of characters permitted in a password for this user account.
- Minimum Password Strength—Choose the password strength. The password strength determines which characters are required in the password:
- Weak—The password can contain any characters.
- Medium—The password has to contain a combination of upper and lower case characters.
- Strong—The password has to contain a combination of upper and lower case characters and digits.
- Very Strong—The password has to contain a combination of upper and lower case characters, digits, and punctuation characters such as commas.
Clear this check box to disable the security features for the user account. If you disable the security features, the user account will use the default security settings that are applied at the server (see Define the Default Security Settings for New User Accounts).
- Allowed Failed Logons—Define the number of log on attempts that are permitted. If the user does not enter the correct Username and Password within the defined number of attempts, the system will disable the user account. The user will be unable to log on via the account until a system administrator has re-enabled the user account by enabling the account (see Enable or Disable a User Account).
- Delayed Lockout—Select this check box to enable ClearSCADA to disable the user account temporarily for the duration defined in the Delayed Lockout Duration field. ClearSCADA will do this if the user does not enter the correct Username and Password within the number of attempts defined in the Delayed Lockout Logons field.
- Delayed Lockout Logons—Define the number of log on attempts that are permitted if the Delayed Lockout feature is enabled. If the user does not enter the correct Username and Password within the defined number of attempts, the system will disable the relevant user account for the duration defined in the Delayed Lockout Duration field.
Specify a value that is smaller than that specified for the number of Allowed Failed Logons.
- Delayed Lockout Duration—Define the duration of time that the user account is disabled if the Delayed Lockout feature is enabled.
Enter the required interval in the OPC Time Format. You can enter the value directly in the field, or use the Interval window (accessed via the field's browse button) to specify the required value. For example, enter 30S to disable the account for 30 seconds.
- Password Dictionary Size—Define the number of passwords that are stored in the password dictionary.
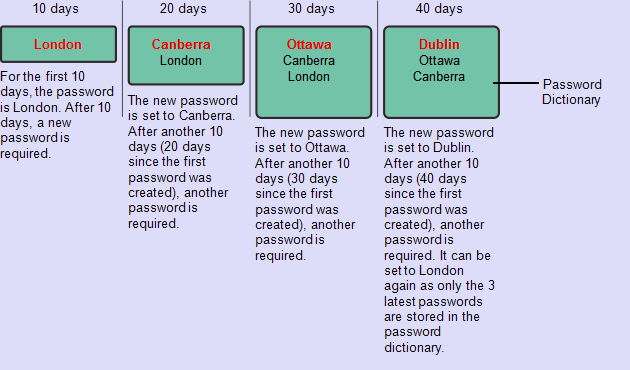
When you create a password, it is stored in the password dictionary. When the Password Expires After time has elapsed, you need to enter a new password. The new password cannot be the same as any of the passwords in the password dictionary.
- Must Have Password—Define whether the user account requires a password. If you select the check box, the user account has to have a password; if you clear it, the user account does not need a password.
- Can Change Password—Define whether the user of the user account can change their own password. If you select the check box, the user will be able to alter their own password via the Change Password action. (For more information, see Change your Password via ViewX in the ClearSCADA Guide to ViewX and WebX Clients.).
- Password Expires After—Define the valid duration of a password. When the amount of time that you define has passed, a new password has to be configured for the user account. This feature is designed to provide additional security by making users change passwords regularly.
Enter the required interval in the OPC Time Format. You can enter the value directly in the field, or use the Interval window (accessed via the field's browse button) to specify the required value. For example, enter 4W for 4 weeks.
Example:
Password Dictionary Size is set to 3, the password dictionary stores the previous three passwords.
Password Expires After time is set to 10 days, each password expires after 10 days.

- Password Expiration Warning Days—Specify the number of days' warning that the user is given in advance of their current password expiring. Once this limit is reached, ClearSCADA generates a diagnostic message whenever the user logs on, informing the user of the number of days that remain until their password expires. The diagnostic message appears in the Messages Window. The user is prompted to change their password before the expiration date occurs.
- Inactivity Logout—Define the amount of time that the user can remain logged on via the user account, but be inactive. If the user does not interact with the system within the defined time, the user session expires. When this happens, the ClearSCADA displays that are open on that ViewX client are hidden from view until the user confirms their password in order to continue their session (see Session Expiry due to User Inactivity). This feature is designed to prevent clients that are unmanned for an extended period of time from being accessed by unauthorized users.
Enter the required interval in the OPC Time Format. You can enter the value directly in the field, or use the Interval window (accessed via the field's browse button) to specify the required value. For example, enter 10M for 10 minutes. The time period you define begins when a user logs on via the user account.