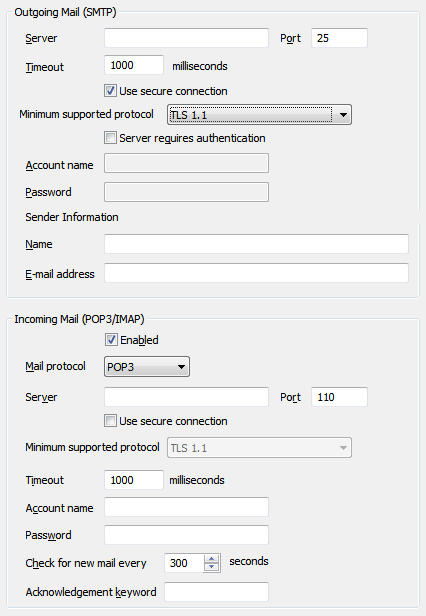
You need to define the e-mail settings for each server so that ClearSCADA can send and retrieve e-mails. The e-mail settings are required if your system is to use the alarm redirection via e-mail feature (see Introduction to Alarm Redirection).
The Outgoing Mail (SMTP) e-mail settings also apply if the Crystal Reports driver is being used to e-mail Crystal Reports and the Use SMTP server to e-mail reports setting is selected. The Use SMTP server to e-mail reports setting is in the Crystal Reports section of the ClearSCADA Server Configuration Tool.
To define the e-mail settings:
- Access the ClearSCADA Server Configuration Tool (see Accessing the ClearSCADA Server Configuration Tool).
- Expand the System Configuration branch of the tree-structure.
- Select E-Mail to display the E-Mail section.

- In the Outgoing Mail (SMTP) section, define these settings:
- Server—Enter the node name or IP address of the mail server to which outgoing e-mail is sent.
- Port—Enter the number of the port via which your mail server receives messages.
- Timeout—Enter the number of milliseconds for which the outgoing server will wait to complete the connection.
- Use secure connection—Select this check box if the Outgoing mail server uses a secure connection. When you select this check box you can the select the Minimum supported protocol.
- Minimum supported protocol—If you are using a secure connection you need to select the protocol that the Outgoing mail server supports.

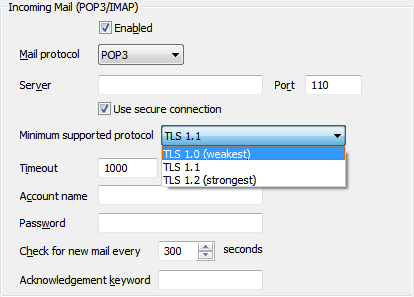
You can select one the following security protocols:
- TLS 1.0—This is the minimum security protocol you can apply and is the weakest, this protocol replaces SSL 3.0.
- TLS 1.1—This is a protocol provided within ClearSCADA with significant updates to TLS 1.0 that provides additional protection against cipher-block chaining attacks.
- TLS 1.2—This is the maximum security protocol you can apply and is the strongest. It encompasses TLS 1.0 and TLS 1.1 with significant additional security enhancements.
You need to select the protocol that is used by the Outgoing mail server to achieve a successful connection.
- Server Requires Authentication—Select this check box if the mail server requires authentication to send outgoing mail; clear this check box if the mail server does not require authentication to send outgoing mail.
- Account Name—If the mail server requires authentication for outgoing mail, enter the name of the mail server log in account in the Account Name field. This field is only available when the Server Requires Authentication check box is selected.
- Password—If the mail server requires authentication for outgoing mail, enter the password for the mail server log in account in the Password field. This field is only available when the Server Requires Authentication check box is selected.
NOTE: ClearSCADA stores username and password information in the registry for use with features such as e-mail, alarm redirection, and system commands. Such information is encrypted using machine details to prevent the encrypted data from being imported onto other machines. Encrypted registry data is intended only to be decrypted by the server that encrypted the data. If you load backup registry files that include encrypted data onto a different server, you will have to re-enter the user data. This is also true if Windows® is re-installed on the machine on which the data was encrypted.
- Name—Enter the name that is associated with outgoing e-mail. This is usually a server user name that corresponds to a setting at the server, and it is displayed in the From field in each message sent by ClearSCADA.
- E-Mail Address—Enter the e-mail address that is associated with outgoing e-mail. This is usually a generic e-mail address for your organization, and it is displayed in the From field in each message sent by ClearSCADA.
- In the Incoming Mail (POP3) section, define these settings:
- Enabled—Either:
- Select the Enabled check box in the Incoming Mail section to allow ClearSCADA to check for incoming e-mail. This means that the acknowledge alarms via e-mail feature can be used.
- Clear the Enabled check box to set ClearSCADA so that it does not check for incoming e-mail. This means alarms cannot be acknowledged via e-mail.
- Mail protocol—You can select one of the following protocols for the Incoming mail server:
- POP3
- IMAP
- Server—Enter the node name or IP address of the mail server from which ClearSCADA retrieves incoming messages.
- Port—Enter the port number of the port via which ClearSCADA retrieves messages from the mail server.
- Use secure connection—Select this check box if the Incoming mail server uses an secure connection. When you select this check box you can the select the Minimum supported protocol.
- Minimum supported protocol—If you are using an secure connection you need to select the protocol that the Incoming mail server supports.

You can select one the following protocols:
- TLS 1.0—This is the minimum security protocol you can apply and is the weakest, this protocol replaces SSL 3.0.
- TLS 1.1—This is a protocol provided within ClearSCADA with significant updates to TLS 1.0 that provides additional protection against cipher-block chaining attacks.
- TLS 1.2—This is the maximum security protocol you can apply and is the strongest. It encompasses TLS 1.0 and TLS 1.1 with significant additional security enhancements.
You need to select the protocol that is used by the Incoming mail server to achieve a successful connection.
- Timeout—Enter the number of milliseconds for which the incoming server will wait to complete the connection.
- Account Name—Enter the account name required to retrieve mail from the (incoming) mail server. Each mail server requires an account name to retrieve incoming mail.
- Password—Enter the password for the account (the account specified in the Account Name field).
- Acknowledgment Keyword—Enter the keyword that has to be included in the subject line of any e-mails sent to ClearSCADA . If the keyword is not included in the subject line, the e-mail is ignored.
By defining a keyword, you configure ClearSCADA so that alarms cannot be acknowledged by auto response e-mails or unrecognized e-mails; to acknowledge an alarm via e-mail, a user has to manually enter the keyword in the subject line of the e-mail prior to sending the e-mail to ClearSCADA .
ClearSCADA supports APOP (Authenticated Post Office Protocol) which provides origin authentication and replay protection when sending the users password on the network. If your mail server supports APOP, ClearSCADA will use APOP automatically.
- Enabled—Either:
- Check for new mail every n seconds—Use to define the how often ClearSCADA checks for new mail. The default setting is 300 seconds, which is suitable for many systems.
If you wish to change the setting, please bear in mind that a setting that is too low may have a detrimental effect on system performance, and a setting that is too high may result in alarms not being acknowledged (via e-mail) within a suitable amount of time.
- Right-click on the system icon in the tree-structure, and select the Apply Changes option to apply the changes.
When you have finished defining the E-Mail settings, you can continue with the server configuration. If you are unfamiliar with the server configuration process, we suggest you proceed to learn about the Events Display Settings for the Event Journal (Events List).