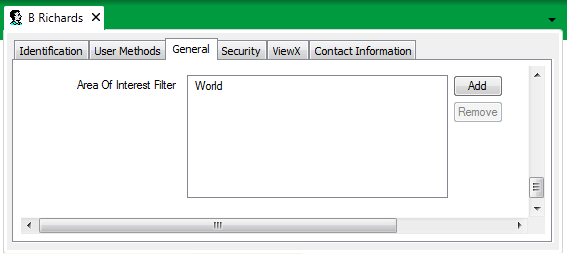
When the Area of Interest feature is enabled on a ClearSCADA system, each user is allocated access to the World Area of Interest, by default. The World Area of Interest is the highest Area of Interest in the hierarchy.
To restrict a user’s alarm and event access to just those area(s) of interest on the system, you need to:
- Remove the World Area of Interest from that user's User Account (see Remove an Area of Interest From a User Account), or replace that Area of Interest with a suitable Area of Interest.
- If the events associated with User Account activity are assigned an Area of Interest, include that Area of Interest in the User Account's Area of Interest Filter field (see below, and also see Define the Area of Interest for Events Logged for a User).
- If required, allocate further Area(s) of Interest to the User Account.
Always make sure that at least one high-level user on your system has access to the World Area of Interest and has permissions to configure other user accounts. Users can only allocate Areas of Interest to which they have access to themselves.
To change an Area of Interest that is assigned to a User Account:
Use this procedure to replace the 'World' or another Area of Interest with a different Area of Interest on a User Account.
- Display the user’s User Form (see Display the User Form in the ClearSCADA Guide to Security).
- Scroll to the Area of Interest section on the General tab.
- Either:
- Double-click on the Area of Interest that you want to replace.
or:
- Select the Area of Interest that you want to replace.
- Press the Enter key on the keyboard.
or:
- Right-click on the Area of Interest that you want to replace.
A context-sensitive menu is displayed. - Select the Browse option.
or:
- Select the Area of Interest that you want to replace.
- Press the Application key on the keyboard.
A context-sensitive menu is displayed. - Select the Browse option.
A Reference browse window is displayed.
- Select the Area of Interest that you want to assign to the User Account in place of the existing Area of Interest.
- Repeat the above for any other Area(s) of Interest that you want to change on the User Account.
Be aware that you cannot add ‘parent’ and ‘child’ Areas of Interest to the filter. A ‘parent’ Area of Interest contains other Areas of Interest (which are referred to as its ‘children’). If you add a ‘parent’ Area of Interest to the filter, all of its ‘children’ are included automatically (though not shown in the list). You cannot add some ‘children’ and exclude other ‘children’ if the 'parent' Area of Interest has been added to the filter.
- Save the configuration.
ClearSCADA generates a diagnostic message if an Area of Interest is specified for a user, and that Area of Interest is already contained within another Area of Interest that is allocated to the same user.
To add an Area of Interest to a User Account:
- Display the user’s User Form (see Display the User Form in the ClearSCADA Guide to Security).
- Scroll to the Area of Interest section on the General tab.
- Either:
- Select the Add button next to the Area Of Interest Filter field.
or:
- Right-click on the Area of Interest Filter field.
A context-sensitive menu is displayed. - Select the Add option.
or:
- Select the Area of Interest Filter field.
- Press the Insert key on the keyboard.
or:
- Select the Area of Interest Filter field.
- Press the Application key on the keyboard.
A context-sensitive menu is displayed. - Select the Add option.
A Reference browse window is displayed.
- Select the required Area of Interest from the window.
- Repeat the above for any other Area(s) of Interest that you want to assign to the User Account.

Be aware that you cannot add ‘parent’ and ‘child’ Areas of Interest to the filter. A ‘parent’ Area of Interest contains other Areas of Interest (which are referred to as its ‘children’). If you add a ‘parent’ Area of Interest to the filter, all of its ‘children’ are included automatically (though not shown in the list). You cannot add some ‘children’ and exclude other ‘children’ if the 'parent' Area of Interest has been added to the filter.
The Area of Interest Filter needs to include the Area of Interest that is associated with the User Account's activity. (This is the Area of Interest that is specified in the separate Area of Interest field near the top of the General tab. For more information, see Define the Area of Interest for Events Logged for a User in the ClearSCADA Guide to Security.) As an alternative to including the individual Area of Interest, it is sufficient to include an Area of Interest that is higher up in the hierarchy (such as that Area of Interest's 'parent' or 'grandparent').
- Save the configuration.
ClearSCADA generates a diagnostic message if an Area of Interest is specified for a user, and that Area of Interest is already contained within another Area of Interest that is allocated to the same user.
To restrict alarm and event access for the Guest User account—the default account that applies whenever a user accesses a ClearSCADA system without logging on—you specify the Area of Interest properties on the Guest User tab of your system’s Root Group Form (see Define the Global Settings for All Guest and Web User Accounts in the ClearSCADA Guide to Security).