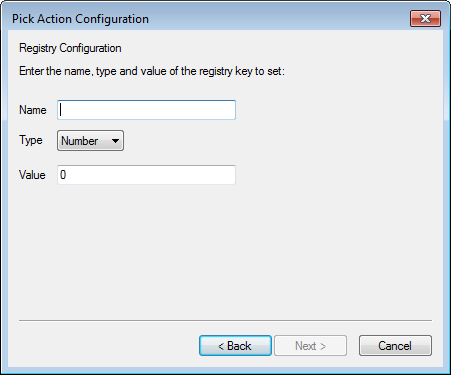
You can use the Pick Action Configuration Wizard to associate a Mimic object with a registry pick action. When the pick action is selected, a value is written to the registry. This value can be used in animations as part of a condition in an expression.
For example, a common use of the registry pick action is to write a value to the registry that is used to determine whether a layer is visible.
You can find more detailed information on using the registry pick action feature for controlling the visibility of layers and applying different filters to an embedded SQL list in Local Variables (Registry Key Settings).
The registry values are stored in the
HKEY_CURRENT_USER\Software\Schneider Electric\ClearSCADA\ViewX/Mimics key in the registry on your client PC.
To set up a registry pick action:
- Display the Pick Action Wizard (see Accessing the Pick Action Configuration Wizard).
- Select the Registry option.
- Use the Disabled check box to define whether the pick action you are setting up is enabled or disabled.
If you select the check box, the pick action will be disabled—it will not be available to users. This setting is designed for use with animations. By animating the PickDisabled property of an object, you can make the availability of a pick action dependent on a condition. For example, you could set the pick action to disabled on the Pick Action Wizard and then use an animation to associate the Mimic object's PickDisabled property with a digital point. The state of the digital point will affect whether the hyperlink is enabled or disabled.
If you clear the check box, the hyperlink pick action is available for selection. This is the default setting.
- Select the Next button.

- Enter the name of the registry in the Name field. If this registry does not already exist, the selection of the pick action will cause the system to create the registry. The registry will have the value that you define in step 7 as its default value.
You cannot include brackets ( ) in the Name.
Typically, engineers configure the animations for a registry pick action before they setup the pick action. If the name of the registry and the default value has already been specified in the animations, the settings on the pick action wizard will not be used to create a new registry (unless they specify a different registry name).
- Use the Type combo box to define the type of value that will be written by the pick action. The value can be:
- Number—The value consists only of numerical characters.
- String—The value contains letters.
- In the Value field, enter the Value that is written to the registry when the pick action is selected. This is the value that will be used as the default value for the registry if the registry does not already exist.
The value will be overridden by any values that are specified as part of a registry animation (see Local Variables (Registry Key Settings)).
- Select the Next button.
- Enter a comment in the Pick Action Comment field (if required). The comment is shown in the status bar when a user positions the cursor over the Mimic object. If you do not enter a comment, a default comment is shown in the status bar instead.
- Select the Next button.
- Select the Finish button.