You can edit the settings for any layer that is listed on the Layers window.
To edit the settings for a layer:
- Display the Layers window (see Display the Layers Window).
- Select the layer that you want to edit by clicking on it in the list of layers.
- Select the Edit button to display the Layer Properties window.

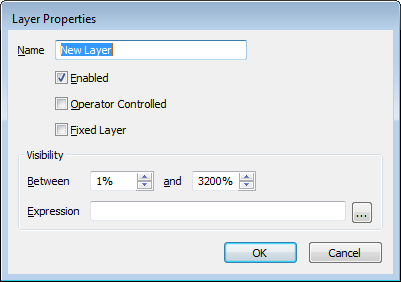
- Use the Layer Properties window to edit the layer:
- Use the Name field to alter or overwrite the existing name. Select the field and type in the required alterations.
- Use the Enabled check box to define whether the layer is active (visible on the Mimic) or inactive (invisible on the Mimic). Select the check box to activate the layer or clear the check box to deactivate it.
- Use the Operator Controlled check box to define whether the layer can be turned on or off by operators.
If you select this check box, operators will be able to access a context sensitive menu on the Mimic that allows them to turn the layer on and off.
If you clear the check box, operators will not be able to control whether the layer is displayed.
- Use the Fixed Layer check box to define whether the layer can be magnified. The Fixed Layer feature is designed for use with layers that contain objects that need to be visible at the defined level of magnification, for example, a menu banner or a company logo.
When the Fixed Layer check box is selected, the layer cannot be magnified. When the Fixed Layer check box is clear, the layer can be magnified as required.
- Use the Visibility settings to define the range of magnification at which the layer is visible. You can also use the Expression setting to associate the layer's visibility with a value in the database or registry.
- Between %—Use the 2 spin boxes to set the range of magnification in which the layer can be seen. For example, if you set the left-hand side spin-box to 50% and the right-hand side spin-box to 90% the layer will only be shown when the Mimic is displayed at 50% magnification or above up to 90% magnification.
The layer visibility settings are particularly useful on Mimics that use layers to contain different levels of detail. For example, a Mimic could be set up to have layers that show a geographical location and detailed information about a site. At the lowest level of magnification, the layer with the least amount of information is shown, such as an overview of an area. As the user zooms in on the area, less of the area is shown but more details such as buildings are revealed.
- Expression—You can use the Expression field to enter a ViewX expression that associates the visibility of the layer with a value. For example, you can set a layer to be visible only when a selected point is in a defined state.
Type in an expression or use the browse button to select a Tag.
The Expression feature is normally used when setting up Local Variables (Registry Key Settings).
- Between %—Use the 2 spin boxes to set the range of magnification in which the layer can be seen. For example, if you set the left-hand side spin-box to 50% and the right-hand side spin-box to 90% the layer will only be shown when the Mimic is displayed at 50% magnification or above up to 90% magnification.
- Select the OK button to confirm the settings and close the Layer Properties window.