You can create a hyperlink that links to another Mimic and also defines a value for one of the target Mimic's parameters. This is useful when you want to manipulate the target Mimic and link to it with a single command. For example, you can create a hyperlink from one Mimic to another Mimic that contains an Alarms List. The target Mimic has parameters that define the filter criteria for the embedded Alarms List (the filter changes according to the value of the Mimic parameter). When the hyperlink is selected on the source Mimic, not only is the target Mimic displayed, but also a parameter value is defined for the target Mimic's parameters. So by selecting the hyperlink, a user can access the embedded Alarms List on the target Mimic and also apply a specific filter (the filter is defined by the parameter value that is included in the hyperlink).
When creating a hyperlink that defines a value for a Mimic parameter on another Mimic, check that the parameters on the target Mimic are configured correctly (see Mimic Parameters). You should also check that the hyperlink pick action uses this format:
SCX:///<System>/<Class>/<Location of Target Mimic>#<Mimic Parameter Name>= "<Mimic Parameter Value>"
Where:
<System> is the name of the system that contains the target Mimic. The system part of the entry can be left blank if the target Mimic is on the same system as the Mimic that contains the hyperlink.
<Class> is the database class that stores the target Mimic. Mimics are stored in the CMimic class, so the class will be CMimic for hyperlinks to other Mimics.
<Location of Target Mimic> is the location of the target Mimic in the database structure. This is the full address of the Mimic and includes Groups and so on. However, you can also set the location to use a relative reference by altering the location manually: replace each level of Group with a period. For more information, see Relative References in the ClearSCADA Guide to Expressions.
# indicates that the remainder of the hypertext string defines parameter settings. The part of the string that defines the parameter settings is called a fragment and is sometimes referred to as the location. To avoid confusion with the location of the target Mimic, we will refer to the second part of the string as the fragment.
<Mimic Parameter Name> is the name of the parameter on the Target Mimic that is to have a value defined for it by the hyperlink. When the hyperlink is selected, the target Mimic will be displayed and a specific value will be defined for the selected parameter on the target Mimic. The name of the Mimic parameter you define in the link has to match the name of the required parameter on the target Mimic exactly.
= indicates that the remainder of the hypertext string defines the value for the parameter setting.
"<Mimic Parameter Value>" defines the value that is to be used as the value for the selected Mimic parameter. The value has to be enclosed in double quotes as the value is a string. If more than one parameter is required, use an ampersand & after each parameter, with each parameter in double quotation marks. For example, #Group= "PLCs" & PointName= "Analog Point 1" would set a value of PLCs for the Group parameter and a value of Analog Point 1 for the PointName parameter.
Do not include the angle brackets < > for any part of the hyperlink definition.
Example:
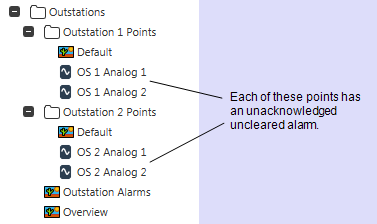
In this example, we have 2 Mimics that are both stored in a Group named 'Outstations'. One of the Mimics is named 'Overview' and the other Mimic is named 'Outstation Alarms'.
The 'Outstations' Group also contains 2 sub-Groups, one named 'Outstation 1 Points' and the other named 'Outstation 2 Points'. Both of these sub-Groups contain 2 points. Each point has one uncleared unacknowledged alarm raised.

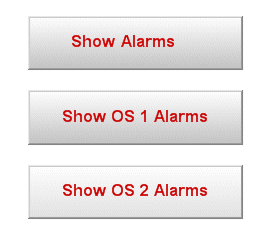
The 'Overview' Mimic is configured to have three buttons:

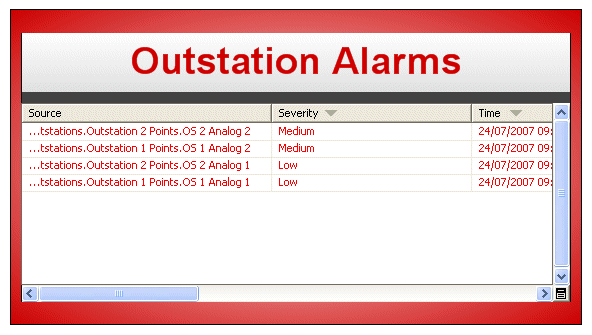
The 'Outstation Alarms' Mimic is configured to have a title text box and an embedded Alarms List:

The Following Parameters are configured for the 'Outstation Alarms' Mimic (via the Edit>Parameters menu option):
Parameter Name: Group
Parent: None
Hint: None
Default Value: Outstations
Parent: None
Hint: None
Default Value: Outstation Alarms
The Title parameter is associated with the title text box on the Mimic by dragging the Title parameter from the Parameters window onto the text box, then selecting the Text option. This automatically sets the text box to use any value that is defined for the Title parameter as the text to be shown in the text box.
The Group parameter is associated with the embedded Alarms List by configuring an animation for the Alarms List's Filter property. The Filter property is animated with the following expression:
'Source="' + "Parameter:Group" + '.*"'
The + is preceded by a double quote and then a single quote. The * is also followed by a double quote and then a single quote. The * is a wildcard character that represents any characters (1 or more).
Example:
This Filter animation sets the Filter property of the Alarms List to use any value that is defined for the Group parameter as the source for the filter. So, if the Group parameter had a value of 'SiteA', the Alarms List would be filtered to only show those alarms that are for database items with a Source of 'SiteA' , that is, alarms for items within the 'SiteA' Group.
On the 'Overview' Mimic, the Show Alarms button is configured to have the following pick action settings (via the Pick Action Wizard):
- Type: Hyperlink
- URL: SCX:////CMimic/.Outstation Alarms
- Type of Reference: Relative
- Mode: Open as Inset
This sets the Outstation Alarms Mimic to be displayed when the Show Alarms button is selected in Design mode.
The Show OS 1 Alarms button has the following pick action configuration:
- Type: Hyperlink
- URL: SCX:////CMimic/Outstations.Outstation Alarms#Group="Outstation 1 Points"&Title="Outstation 1 Alarms"
- Type of Reference: Relative
- Mode: Open as Inset
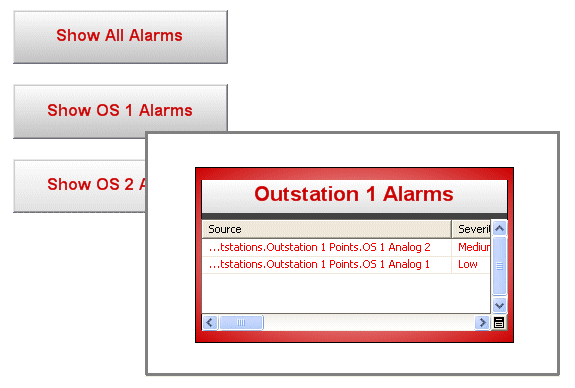
The URL entry sets the button to hyperlink to the Outstation Alarms Mimic and sets two values: Outstation 1 Points is the value that is set for the Group parameter and Outstation 1 Alarms is the value that is set for the Title parameter. So, when a user selects the Show OS 1 Alarms button, the Outstation Alarms Mimic will be displayed in an inset window. It will display 'Outstation 1 Alarms' in its text box (as that is the value defined for the Title parameter which is used to animate the Text value of the text box) and its embedded Alarms List will only display those alarms for points in the Outstation 1 Points Group (as Outstation 1 Points is the value defined for the Group parameter which is used to animate the Filter property of the embedded Alarms List).

The Show OS 2 Alarms button works in a similar way to the Show OS 1 Alarms button and has similar configuration. The only difference is that the Show OS 2 Alarms button's hyperlink sets the inset Outstation Alarms Mimic to display Outstation 2 Alarms in the text box and to only show the alarms for points in the Outstation 2 Points Group in the embedded Alarms List. To achieve this, the following configuration is defined for the Show OS 2 Alarms button's hyperlink pick action:
- Type: Hyperlink
- URL: SCX:////CMimic/Outstations.Outstation Alarms#Group="Outstation 2 Points"&Title="Outstation 2 Alarms"
- Type of Reference: Relative
- Mode: Open as Inset
So, when the Outstation Alarms Mimic is displayed as a Mimic in its own right, it displays an embedded Alarms List that contains the alarms for points within the Outstations Group. Its text box displays the Default Parameter value for the Title parameter, which is Outstation Alarms. When the Outstation Alarms Mimic is displayed as a result of selecting the Show OS 1 Alarms button or Show OS 2 Alarms button, the Outstation Alarms Mimic is shown as an inset and is filtered to only show the alarms for points in the Outstation 1 Points or Outstation 2 Points Group respectively. Its text box is also configured to show Outstation 1 Alarms or Outstation 2 Alarms.