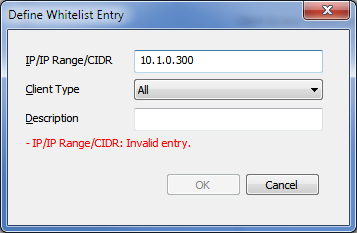
When you Enable and Manage the Client Access Control List you need to define the clients that will be authorized to connect to the ClearSCADA server. Only the clients with the correct IP addresses and correct Client Types will have access to the server.
To add a client or group of clients to the CACL use the following procedure:
- Display the Server Configuration Tool and log on if required.
- Expand the System Configuration branch of the tree-structure.
- Select the Security entry and locate the section to display the Client Access Control List section.
- Select the Add button.
wThe New Entry window is displayed.
Complete the following fields:
- IP/IP Range/CIDR—Enter an IP address or range of addresses for the clients that you want to authorize to access the server. Use one of the following formats:
- IP—Enter an individual IP address for each client that you want to allow access to the server.
Example:
10.0.1.10
- IP Range—Enter a range of IP addresses for two or more clients that you want to allow access to the server.
Example:
10.0.1.20-30allows a block of 11 clients with the IP addresses 10.0.1.20 to 10.0.1.30 used. - CIDR—Use the Classless Inter-Domain Routing notation to enter a range of IP addresses. CIDR notation is a compact representation of an IP address and its associated routing prefix. The IP address is expressed according to the standards of IPv4. It is followed by a separator ('/') character and the prefix size is expressed as a decimal number.
The address may denote a single, distinct interface address or the beginning address of an entire network. The maximum size of the network is given by the number of addresses that are possible with the remaining, least-significant bits below the prefix. This is often called the host identifier.
Example:
The IPv4 block
192.168.100.0/24represents the 256 IPv4 addresses from192.168.100.0to192.168.100.255.The IPv4 block
192.168.100.0/22represents the 1024 IPv4 addresses from192.168.100.0to192.168.103.255.All entry types are checked to ensure that the entries are valid. A message will indicate any invalid entry values.

- IP—Enter an individual IP address for each client that you want to allow access to the server.
- Client Type—Use this combo box to select the type of clients for an IP address or block of addresses.

Choose from the following:
- All—Select the option to connect all types of clients with specified IP addresses.
- Data—Select the option for third-party automation connections (for example, COM and .NET programs) over specified addresses.
- OPC—Select the OPC option for OPC data connections (for example, OPC AE, OPC DA, OPC HDA) over specified addresses.
- Utilities—Select this option for ClearSCADA utilities (for example, Server Configuration Tool, Server Status tool and so on). When you authorize a ViewX client you can use the tools over the network.
- Example: if you want to use these tools directly on the server you require the localhost address (
127.0.0.1). - ViewX—This allows ViewX clients to connect over the specified addresses.
- WebX—This applies to WebX connections and allows specified clients to use web browsers to access the server.
- Description—Optionally add a description about the connection.
- IP/IP Range/CIDR—Enter an IP address or range of addresses for the clients that you want to authorize to access the server. Use one of the following formats:
- Select OK to complete the entry.
- Apply the changes to the server.