ATTENTION: This section and associated topics apply to the Original WebX client only.
As part of your system's security measures, we recommend that you use a proxy server or proxy firewall for communications between the Web server and Original WebX clients.
A proxy server can facilitate:
- Running a ClearSCADA server on a host that is not directly addressable from the Internet
- Indirect addressing of HTTP and HTTPS services, so providing anonymity by avoiding advertising the ClearSCADA host system. (Instead, only details about the proxy are revealed, with the information itself providing no indication that a proxy is being used.)
The firewall that is used as a proxy firewall can differ from other firewalls that are used on your system. For example, you might use a proxy firewall for the externally addressed route between the Web server and Original WebX clients, and a separate firewall to otherwise limit access from your corporate intranet/internet/extranet.
If your system uses a proxy server or proxy firewall between the Web server and Original WebX clients, you can configure the proxy application to map the Web server's ports to proxy ports. You then use the Server Configuration Tool to mirror this proxy configuration by indicating the mapping that you have configured in that application (the actual mapping does not occur in ClearSCADA).
Although you only mirror one set of port mapping details in the WebX Configuration Tool, this does not restrict your system to connecting to that proxy directly. The actual network configuration and mapping is set up outside of ClearSCADA. In the ClearSCADA Server Configuration Tool, you merely specify the proxy port mappings of the proxy server that you want ClearSCADAto advertise in place of the ClearSCADA host system.The settings need to match the actual proxy settings that are configured in the proxy application in which the actual mapping occurs.
Mirroring the proxy server configuration does not prevent Original WebX clients from attempting to connect directly to the Web server's HTTP and HTTPS ports. As such, you should consider whether other network measures need undertaking to deny direct access to those ports.
The configuration of the proxy server can facilitate hiding the identity of the ClearSCADA host system.
Mirroring the proxy configuration in ClearSCADAaffects web-related transmissions:
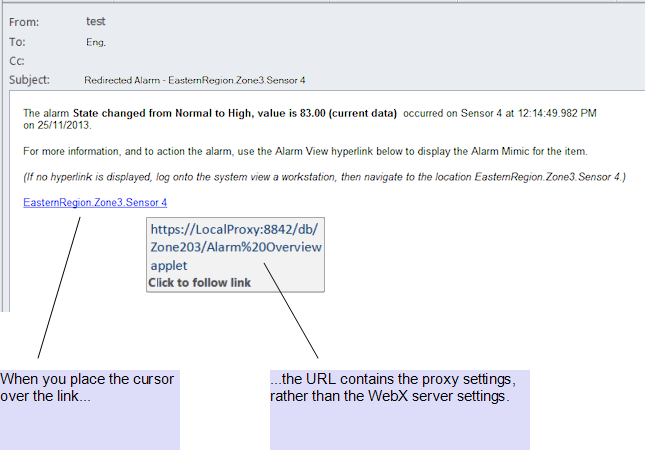
- Alarms that are redirected via e-mail include alarm links that address the proxy server
- WSDL files produced by ClearSCADA include the proxy host's address and HTTP/HTTPS port settings.
(Web Services Description Language (WSDL) files provide a machine-readable description of a service that indicates, amongst other information, how other devices can contact the host device.)
To specify the proxy settings that exist on your system:
- Use the fields in the Proxy section to define the required proxy settings:

- Select the WebX Server behind Proxy/Firewall check box if your system uses a proxy server or proxy firewall between the Web server and WebX clients, for the HTTP and/or HTTPS ports on the ClearSCADA server.
Clear the check box if your system does not use a proxy server or proxy firewall. The rest of the fields in the Proxy section are 'grayed out' and unavailable for use, and the rest of the steps in this procedure do not apply.
- Use the Server field to specify the proxy server name or URI (Uniform Resource Identifier). If required, you can enter up to 2000 characters in the field. The characters and syntax that you can use is restricted to the generic syntax that is supported by URI schemes.
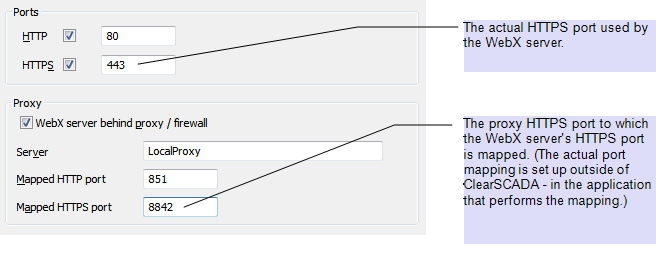
- Use the Mapped HTTP Port field to specify the port on the proxy server that is mapped through to the Web server's HTTP Port.
Leave the field at the default of 0 (zero) if the Web server only communicates via an HTTPS port.
- Use the Mapped HTTPS Port field to specify the port on the proxy server that is mapped through to the Web server's HTTPS Port.
Leave the field at the default of 0 (zero) if the Web server only communicates via an HTTP port.
NOTE:If a proxy is used, you need to use the Mapped Port fields to map each port that is configured for use by the Web server. So, for example, if the Web server uses both the HTTP and HTTPS ports, you need to provide suitable mappings for both of those ports (rather than just one of them). However, if the Web server only uses one port (such as the HTTPS port), you only need provide a suitable mapping for that particular port. The Web server's HTTP and HTTPS ports are defined in the Ports section of the Tool (see Define the Ports Settings for Original WebX Clients).
- Select the WebX Server behind Proxy/Firewall check box if your system uses a proxy server or proxy firewall between the Web server and WebX clients, for the HTTP and/or HTTPS ports on the ClearSCADA server.
- Apply the changes to the server.
- If your system comprises multiple ClearSCADA databases, check whether any Mimics in the other ClearSCADA databases contain cross-database hyperlinks to 'target' documents in the database located on the local server (the server on which you have defined the Original WebX proxy settings). If so, ensure that the Cross-Database Hyperlinks settings are updated on the servers on which the other databases are located, so that the cross-database hyperlinks on those Mimics reference the WebX proxy ports, rather than the actual Web server's ports (see Define the Cross-Database Hyperlinks Settings in the ClearSCADA Guide to Server Administration).
Example:
A ClearSCADA system is set up to use a proxy. The Web server's Port and Proxy settings are configured as follows:

The above settings are displayed in the Information sub-category (within the General category) of the Server StatusTool:

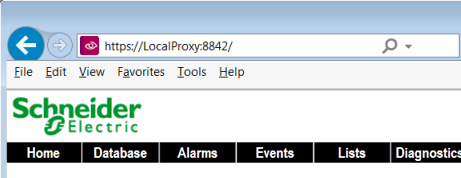
When users access the ClearSCADA database using a WebX client, the URL contains the proxy information, rather than the Web server details:

The system uses ClearSCADA's Alarm Redirection feature to redirect certain alarms via e-mail. When an alarm is redirected, the e-mail message contains a hyperlink that enables the recipient to display an Alarm Mimic for the database item to which the alarm relates. As the system uses a proxy, the hyperlink only includes proxy information, rather than identifying ClearSCADA's Web server:

Further Information
General Server Status Information: see General System Status Information in the ClearSCADA Guide to the Server Status Tool
Alarm Redirection: see the ClearSCADA Guide to Alarm Redirection
WebX client connection settings: see Connect to the System via a WebX Client or XML Client in the ClearSCADA Guide to Client Administration
How a proxy setup can affect Mimic hyperlinks: see Define the Cross-Database Hyperlinks Settings in the ClearSCADA Guide to Server Administration.