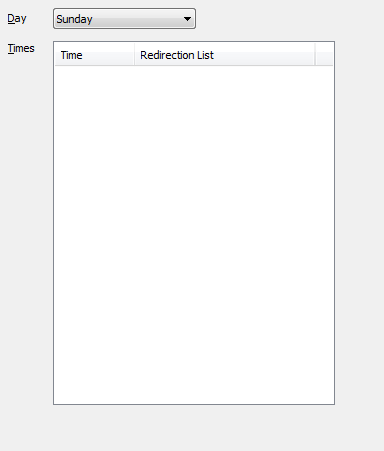
You can use the Alarm Action Calendar "branch" on the ClearSCADA Server Configuration Tool to define the default time settings for new alarm action calendars. These settings are useful when your system has calendars that use the same schedule times for the individual days of the week—by defining the default settings, you allow new calendars to already have the required settings in place when they are first created. This reduces the amount of configuration work required.
Before you define the default settings for alarm action calendars, you need to be familiar with the configuration of calendars and understand how they are used with the Alarm Redirection feature. If you are unfamiliar with these concepts, see Introduction to Alarm Redirection.
To define the default Alarm Action Calendar settings:
- Access the ClearSCADA Server Configuration Tool (see Accessing the ClearSCADA Server Configuration Tool).
- Expand the Database Configuration branch of the tree-structure.
- Select the Alarm Action Calendar branch to display the Alarm Action Calendar settings.
-

- The Alarm Action Calendar settings work in a similar way to the Edit Day Schedule window that engineers use when configuring calendars. By right-clicking in the Times area, you can access a context sensitive menu that has an Add Time option for adding new custom time periods to the days in the list. When there are times in the Times section, the context sensitive menu will also have a Delete option for removing custom times, and a Modify option for editing the settings for the custom times.
- Use the Day combo box to choose the day of the week for which the selected times will apply.
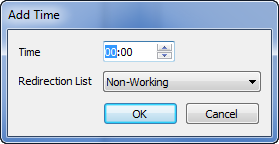
- Right-click in the Times area and select the Add Time option to display the Add Time window.
-

- Use the Time spin box to define the start of a time period for which there is a specific alarm redirection (the alarm redirections are set on the Calendar Forms).
- Use the Redirection List combo box to choose the alarm redirection that will be used during the specified time period (the end of the time period is at 00:00 of the next day or the start of the next time period for the current day). The Redirection List options are:
- Non-Working—Corresponds to the alarm redirection settings that are specified on the Non-Working Time Redirections tab of each Calendar's Form. Typically, these settings are used to define alarm redirections that are used when work stations are unmanned, for example, during times that are out of normal working hours.
- Working 1 to Working 7—Correspond to the alarm redirection settings that are specified on the Working Redirections tabs (Working 1 - Working 7) of each Calendar's Form. Typically, these settings are used to define alarm redirections that are used during non-standard out of work hours.
- Select the OK button to confirm the time settings. The time is added to the Times section.
- Repeat this procedure for each required time.
If you need to alter the settings for a time, right-click on the time then select the Modify option from the context sensitive menu. Use the Modify Time window in the same way as you use the Add Time window—the only difference is that you are changing the settings of an existing time rather than creating a new time.
If you need to remove a time, right-click on the time then select the Delete option.
When you have finished defining the default Alarm Action Calendar settings, you can continue with the server configuration. If you are unfamiliar with the server configuration process, we recommend that you proceed to learn about Alarm Limits.