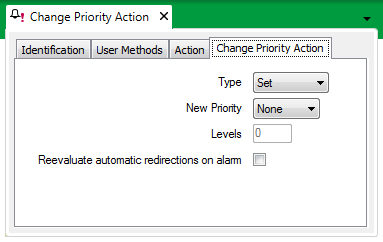
You can use the Change Priority Action Form’s Change Priority Action tab to alter the severity level of the alarm.
To define the new priority of the alarm:
- Display the Action Form for the Change Priority Action that you want to configure.
- Select the Change Priority Action tab.

- Use the Type combo box to define whether you want to set the alarm to a particular priority, or whether you want to increase or decrease the priority level.
Choose from:
- Set—Select this option if you want to choose a particular priority for the alarm. Use this setting in conjunction with the New Priority field to specify the alarm priority (now go to Step 4).
- Increase—Select this option if you want to raise the alarm priority by a particular number of levels. Use this setting in conjunction with the Levels field to specify by what amount you want to raise the priority (now go to Step 5).
- Decrease—Select this option if you want to lower the alarm priority by a particular number of levels. Use this setting in conjunction with the Levels field to specify by what amount you want to lower the priority (now go to Step 5).
- If you have chosen ‘Set’ from the Type field, use the New Priority combo box to select the required alarm priority.
A set of priority levels is provided for each ClearSCADA system (see Defining Severities in the ClearSCADA Guide to Core Configuration). The default priority levels are shown above—these can be overridden with custom priority levels (see Alarm and Event Severities in the ClearSCADA Guide to Server Administration). Choose the appropriate priority level from the list available on your system.
Now go to Step 6.
Choose the ‘None’ option if you want the redirection action to clear the alarm.
- If you have chosen to Increase or Decrease the alarm level using the Type field, use the Levels field to specify by how many priority levels the alarm priority is to change when it is redirected.
Example:
An alarm is priority 3. If the alarm has not been acknowledged after 10 minutes, it is redirected, and its priority is increased by 2, resulting in a priority 1 alarm.
- You can optionally use a Change Priority Action to re-evaluate each of the redirection actions that apply to, and are configured to trigger automatically for, a particular alarm.
Select the Reevaluate automatic redirections on alarm check box if ClearSCADA is to re-evaluate each of the redirections that are set to trigger automatically for the alarm, whenever this Change Priority Action is triggered. Following the re-evaluation, ClearSCADA will trigger each of the automatic redirections that now pass the redirection criteria, and cancel each of the automatic redirections that do not pass the redirection criteria (taking the redirection settings on the relevant database item’s Redirection tab into account). Any redirection actions that were triggered before the alarm changed severity, will be re-triggered if they pass the redirection criteria.
Example:
A Change Priority Action raises the severity of an alarm from Medium to High.
As the action’s Reevaluate automatic redirections on alarm check box is selected, ClearSCADA re-evaluates each of the automatic redirections for the alarm. (The redirection actions are listed on the relevant database item’s Redirection tab.)
Any redirections to which the new severity applies, and which meet the other redirection criteria, are triggered after their specified Delay times.
Any redirections to which the new severity or other redirection criteria do not apply are canceled.
(Any redirection actions that have a Trigger Type of Manual are ignored during the re-evaluation process—users can still trigger these manually if the redirection criteria still applies to those actions, and the users have the required permissions to trigger such redirection actions.)
For another example that further demonstrates the re-evaluate process, see Use a Change Priority Action to Re-evaluate other Redirection Actions.
Clear the Reevaluate automatic redirections on alarm check box if ClearSCADA is not to attempt to perform any other redirections as a result of this Change Priority Action being triggered.
- Save the configuration (see Saving Configuration Changes in the ClearSCADA Guide to Core Configuration).
When you have configured the required Change Priority Actions, you can proceed to Configure Alarm Redirections for an Item or Group.