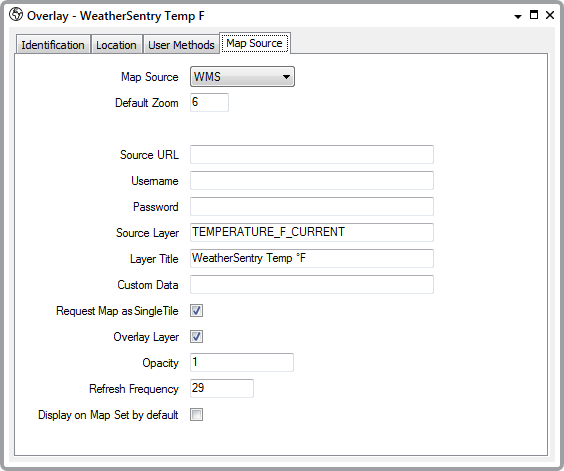
To configure a Map Source you use the Map Source tab of a Map Source form (see Configuring a Map Source).
This section describes the WMS Map Source.
The WMS protocol (OpenGIS® Web Map Service Interface Standard) provides a simple HTTP interface for requesting map images from one or more distributed geospatial databases. A server will respond to a WMS request by sending one or more map images that ClearSCADA can then display as part of a composite map.

- Map Source—Use this combo box to enter the type of this Map Source. In this case, you would select the WMS option and the Map Source database item will represent a WMS map layer. For example, this could be a map image representing rainfall or wind strength and direction data.
- Default Zoom—Define the default zoom level for this WMS layer.
The Default Zoom level is the magnification level that ClearSCADA will apply to a map layer when it first displays it. Users can then use manual controls to either zoom in or zoom out from this default level (that is, they can increase the magnification or decrease it). For more information, see Using a ClearSCADA Map. If you increase the Default Zoom level, users will be able to see the map layer's features in greater detail. If you decrease the Default Zoom level, users will see less detail. The lowest zoom level is 0; this represents the lowest magnification level. The highest zoom level is 22; this represents the highest magnification level.
- Source URL—Enter the Uniform Resource Locator (URL) of the WMS protocol map server that hosts the map layer that you want to use. For example: http://environment.data.gov.uk/ds/wms.
For more information, see the Web Map Service Implementation Specification published by the OpenGIS Consortium Inc.
- Username—Enter the username that gives access to the WMS protocol map server (if required).
- Password—Enter the password that gives access to the WMS protocol map server (if required).
- Source Layer—Enter the name of the map image on the WMS server that you want to use (see Source URL). This will form a part of the HTTP request. For example, the map image might be: eainspire2011-wms-ufmfsw_flood_extent_1in30.
For more information, see the Web Map Service Implementation Specification published by the OpenGIS Consortium Inc.
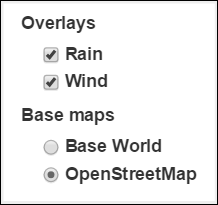
- Layer Title—The ClearSCADA title for this map layer. You can enter any title that you want. However, the title will appear on the Layer menu that ClearSCADA map users can display, so aim to make the title as meaningful as possible (see Using a ClearSCADA Map).
A typical Layer menu looks like this:

- Custom Data—Enter any parameters that you want to include in the HTTP request for the map layer. For example, INTERFACE=ENVIRONMENT. As a further example, a hypothetical HTTP request for a map, with parameters, might look like this:
http://a-map-co.com/mapserver.cgi?VERSION=1.1.0&REQUEST=GetMap&
SRS=EPSG:4326&BBOX=-97.105,24.913,78.794,36.358&
WIDTH=560&HEIGHT=350&LAYERS=AVHRR-09-27&STYLES=&
FORMAT=image/png&BGCOLOR=0xFFFFFF&TRANSPARENT=TRUE&
EXCEPTIONS=application/vnd.ogc.se_inimage
For more information, see the Web Map Service Implementation Specification published by the OpenGIS Consortium Inc.
- Request Map as a Single Tile—Select this check box if you want the map to be displayed as a single tile at the requested magnification. This reduces the number of map requests that are sent to the service provider. Leave this check box clear if you want to use multiple tiles.
Requesting a map to display as a single tile reduces the number of requests to the server, however, this increases the bandwidth required. Using multiple tiles to display the map significantly increases the number of requests to the server, but will require less bandwidth.
- Overlay Layer—Select this box if you want this map layer to be an overlay. Clear this box if you want this map to be a base layer. For more information about overlays and base layers, see About ClearSCADA Maps.
- Opacity—You can specify how transparent or opaque you want this map layer to be. This field will only be available if you select the Overlay Layer check box. The more transparent the layer, the more users will be able to see the graphical information in other map layers. You must enter a number between 0 and 1, where 1 is an opaque layer and 0 is a layer which is effectively invisible. For example, 0, 0.4, 0.7 and 1 are all valid entries. 1.5 is not a valid entry. If you set an Opacity of 0.1, ClearSCADA will display a very faint rendering of the layer. As you increase the number towards 1, the more opaque the layer will be - and the layer will potentially become more likely to obscure the details of other layers. We recommend that you experiment with the Opacity setting to find the right balance.
- Refresh Frequency—Specify how frequently (in minutes) you want ClearSCADA to send a request to the map server to update (refresh) the map layer data. This helps to ensure that a ClearSCADA composite map shows the latest information for this layer. This field will only be available if you select the Overlay Layer check box.
- Display on Map Set by default—Select this check box if you want ClearSCADA to display this map layer automatically when it loads a Map Set that includes this layer. Clear this check box if you do not want this map layer to display automatically. This field will only be available if you select the Overlay Layer check box.