Do not confuse the Set Responsibility Action with 'regions of responsibility'. To define a 'region of responsibility', you use the 'Regions' tab on the relevant user-type configuration Form (see Assign Regions of Responsibility in the Geo SCADA Expert Guide to Security).
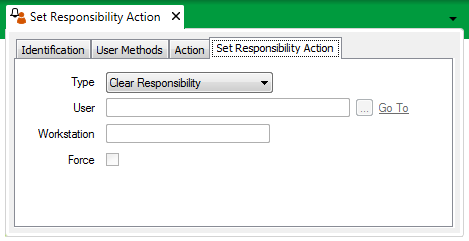
Use the Set Responsibility Action Form’s Set Responsibility Action tab to specify whether the ability to acknowledge alarms is to be restricted once the alarms have been redirected using this redirection action:
- Display the Action Form for the Set Responsibility Action that you want to configure.
- Select the Set Responsibility Action tab.

- Use the Type combo box to define whether the ability to acknowledge redirected alarms is to be restricted.
Choose from:
- Clear Responsibility—The ability to acknowledge alarms is not to be restricted to a particular User, User Group, or ViewX workstation. Any user that has access to the alarms and is allocated the Acknowledge Alarms security permission for the item(s) that are in alarm can acknowledge the redirected alarms.
This option can be used to clear an existing restriction on acknowledging alarms, so that any user with the relevant alarm access and security permissions can acknowledge the alarms.
Now go to step 6.
- Set Responsible User—The ability to acknowledge the redirected alarms is restricted to a particular User or User Group. Go to step 4.
- Set Responsible Workstation—The ability to acknowledge the redirected alarms is restricted to a particular ViewX workstation.
When this type of redirection is in force, the alarm(s) to which the redirection action applies cannot be acknowledged from a Virtual ViewX client, an Original WebX client, nor a ViewX client that is running an older version of Geo SCADA Expert (one that does not support Set Responsibility functionality).
Now go to step 5.
- Clear Responsibility—The ability to acknowledge alarms is not to be restricted to a particular User, User Group, or ViewX workstation. Any user that has access to the alarms and is allocated the Acknowledge Alarms security permission for the item(s) that are in alarm can acknowledge the redirected alarms.
- If you have chosen ‘Set Responsible User’ from the Type field, select the browse button next to the User field to display a Reference browse window.
A list of Users and/or User Groups is displayed.Select the required User or User Group from the list. Ensure that the specified User(s) have access to any redirected alarms and are allocated the Acknowledge Alarms security permission for the item(s) that might generate an alarm.
ATTENTION: If the Area of Interest feature is enabled on your system, ensure that the specified User(s) are allocated the Area of Interest that allows them to access any redirected alarms (see Restrict Alarm and Event Access to Specific Areas of Interest in the Geo SCADA Expert Guide to Core Configuration).
For information on Users, see User Accounts in the Geo SCADA Expert Guide to Security; for information on User Groups, see User Groups in the Geo SCADA Expert Guide to Security.
Now go to step 6.
- If you have chosen ‘Set Responsible Workstation’ from the Type field, use the Workstation field to specify the name of the ViewX workstation on which alarms can be acknowledged. The ViewX workstation has to be running a suitable version of Geo SCADA Expert (one that supports Set Responsibility functionality).
If required, you can specify the names of multiple workstations, although only one will be assigned alarm responsibility. Enter the workstation names as a comma-separated list, in the order in which you would like Geo SCADA Expert to check the workstations. Each ViewX workstation has to be running a suitable version of Geo SCADA Expert (one that supports Set Responsibility functionality). Geo SCADA Expert will assign responsibility to the first workstation that is found to be connected to the system.
To ascertain the name that is assigned to a particular ViewX client, look at the Workstation Name that is assigned to that client on the Client Configuration window (see Define the Workstation Name for the ViewX Client in the Geo SCADA Expert Guide to Client Administration).
- Save the configuration (see Saving Configuration Changes in the Geo SCADA Expert Guide to Core Configuration).
When you have configured the required Set Responsibility Actions, you can proceed to Configure Alarm Redirections for an Item or Group.
If the ability to acknowledge alarms is restricted to a particular User, User Group, or Workstation, other users who can view the redirected alarms will not have access to the Acknowledge or Acknowledge with Comment actions for those alarms.
To ascertain which User, User Group, or Workstation has responsibility for acknowledging the alarms via the Acknowledge or Acknowledge with Comment actions, either:
- View the entries in the Events List. (Geo SCADA Expert logs separate entries for each alarm, alarm redirection, and the name of any user, user group, or workstation that is assigned responsibility for acknowledging a redirected alarm.)
or:
- Use the View Status action to view the Status display of the item that is in alarm.
For an example that shows the type of information that is included in the above displays and demonstrates how this type of redirection action might be used, see Use a Set Responsibility Action to Restrict the Ability to Acknowledge Alarms.
Your system may be configured to use a different background color to indicate whether you can acknowledge an alarm. If so, any unacknowledged alarms (including redirected alarms) that you can acknowledge will have a different background color on alarm displays. For more information, see The Background Color used on Alarms Lists and the Alarm Banner in the Geo SCADA Expert Guide to Alarms.
Geo SCADA Expert provides several methods—ClearAlarmResponsibility, SetAlarmResponsibleUser, and SetAlarmResponsibleWorkstation—that you can use to set or clear the restriction placed on acknowledging alarms. The methods are associated with the CAlarmObject and CGroup database tables. For more information on each method, see the database Schema.