You can embed Mimics on other Mimics, with up to a maximum depth of 6 levels of embedding in total. This means that you can create a Mimic display that contains other Mimic displays (some of which themselves might contain other embedded Mimics).
Embedded Mimics are especially useful on Mimics that provide an overview—you can create a Mimic that contains status information and so on, and also contains a visual representation in the form of an embedded Mimic. The overview Mimic can also contain links to the Mimic that is embedded.
With Original WebX clients, you can only access data from one Geo SCADA Expert database at a time. As such, when viewing Mimics on an Original WebX client, you can only view 'live' data on an embedded Mimic if that embedded Mimic and the data on it are sourced from the same database as the Mimic on which they are embedded.
For more information, see Differences Between the Original WebX Client and ViewX.
Example:

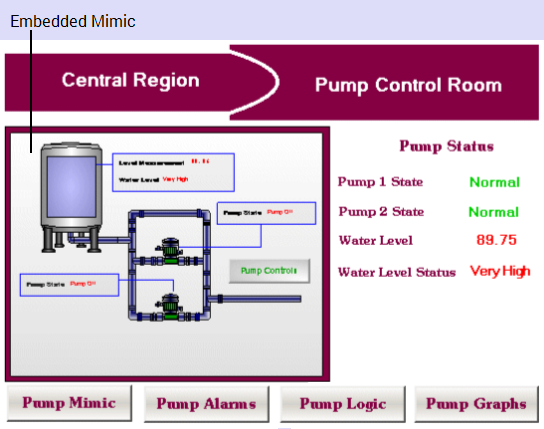
Embedded Mimics are particularly useful on Mimics that provide an overview of a specific part of the system. For example, this Mimic contains an overview of status information, buttons that link to related displays, and a visual overview in the form on an embedded Mimic.
Each Mimic can contain a maximum depth of 6 levels of embedded Mimics (the top-level Mimic, plus up to 6 levels of Mimics embedded on that Mimic). This is a hard coded limit that is designed to help prevent embedded Mimics from causing an infinite loop where Mimics are constantly reloaded.
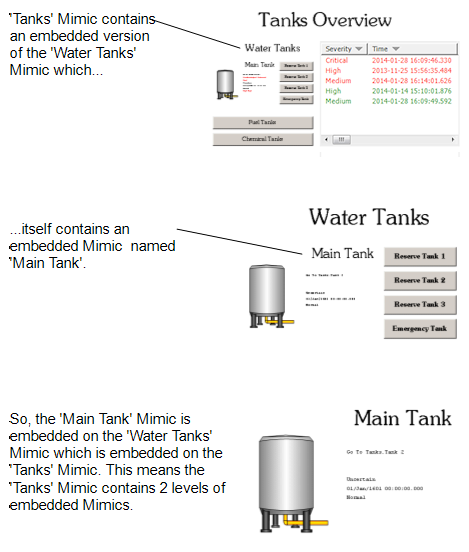
For example, if a Mimic named 'Tanks' contains an embedded Mimic named 'Water Tanks', and the 'Water Tanks' Mimic contains an embedded Mimic named 'Main Tank', then the 'Tanks' Mimic contains 2 levels of embedded Mimics:

If you exceed the permitted depth of embedded Mimic levels, a level limit icon:

is displayed in place of those embedded Mimics that are too deep (more than six levels of embedded Mimics in total). The icon is displayed in both Run Mode and Design Mode, so that users are aware of which embedded Mimic has caused the maximum depth to be exceeded.
To add an embedded Mimic to a Mimic:
- Display the Mimic that is to contain the embedded Mimic. You need to display the Mimic in Design mode.
- Select Mimic in the Drawing command group on the Graphics Tab.

- Draw the outline of the embedded Mimic by pressing the left-hand mouse button, and moving the cursor while keeping the left-hand mouse button pressed. The rectangle that is drawn is the space that will be occupied by the embedded Mimic.
- Release the left-hand mouse button to display a browse window.
- Use the browse window to locate the Mimic that you want to embed.
- Select the Mimic that is to be embedded, then select the OK button to confirm.
The browse window is closed and the Mimic is embedded.
Alternatively:
- Display a Mimic in Design mode.
- Display the Database Bar (see Display an Explorer Bar).
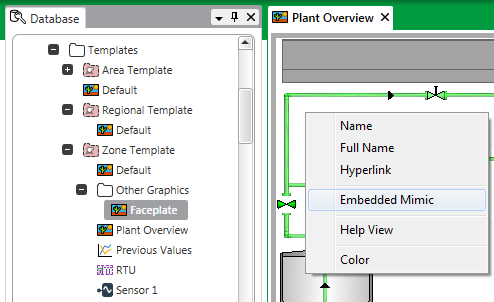
- In the Database Bar, select the Mimic that you want to embed and drag it onto the Mimic that you have already displayed in Design mode.
A context sensitive menu is displayed. - Select the Embedded Mimic option to embed the Mimic.

You can resize the embedded Mimic by selecting it and dragging its sides. Similarly, you can reposition it by selecting it and dragging it to a new position.
You can edit the embedded Mimic by double-clicking on it (see Editing an Embedded Mimic).
You can also access editing features by right-clicking on the embedded Mimic to display a context sensitive menu (see Mimic Editing Features).