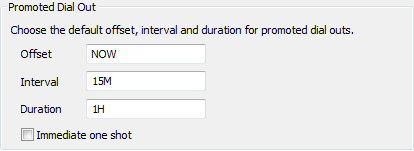
You can use the Outstations section display of the ClearSCADA Server Configuration Tool to change the default promoted outstation settings.
Some outstations can be promoted temporarily so that they are scanned in preference to other outstations. This is useful during times of important operation procedures, for example, when feedback is required following a control being issued.
The default promoted dial out settings define the amount of time between each dial out to a promoted outstation and the total amount of time each outstation is promoted. They also determine whether a One Shot data retrieval is performed as soon as an outstation is promoted, or whether the One Shot only occurs after the first interval.
When an operator uses the Promote Dial Out action for an outstation or outstation set, a Promoted Dial Out window is displayed. The operator can use the Promoted Dial Out window to define the amount of time for which the outstation will be promoted, and the amount of time between each dial out. The settings that you define on the Outstations section are the settings that are in place when any operator uses the Promote Dial Out action—the operators can change the settings for the individual outstation promotion action that they are performing, but they cannot alter the settings that are shown by default.
To change the default promoted outstation settings:
- Access the ClearSCADA Server Configuration Tool (see Accessing the ClearSCADA Server Configuration Tool).
- Expand the Global Parameters branch of the tree-structure.
- Select Outstations to display the Outstations section.

- Define the default start time for dialing out to a promoted outstation in the Offset field. The time you enter in the Offset field defines when the first dial out (attempt by the server to request data from an outstation) will occur. Subsequent dial-outs will take place at the time defined by the Interval.
You need to define the time in the OPC time interval format, for example, 25M for 25 minutes.
- Define the default amount of time between each dial out to a promoted outstation in the Interval field. A dial out is an attempt by the server to request data from an outstation.
You need to define the time in the OPC time interval format, for example, 25M for 25 minutes.
- Define the default maximum time for which an outstation is promoted in the Duration field.
You need to define the time in the OPC time interval format, for example, 3H for 3 hours.
- Define whether a One Shot is performed immediately on each promoted outstation by default. The One Shot is performed as soon as the outstation is promoted or whether there is a delay before the One Shot occurs (the delay is the Interval):
- Select the Immediate One Shot check box to specify that a the first dial out occurs immediately when an outstation is promoted. This means that data is retrieved as quickly as possible, which is useful in emergency situations such as when flooding occurs.
- Clear the Immediate One Shot check box to specify that the first dial out occurs after the end of the first interval when an outstation is promoted. This is useful when an outstation has dialled in and reported an alarm, which then triggers an alarm redirection action to promote the dial out of the same outstation.
- Right-click on the system icon in the tree-structure, and select the Apply Changes option to apply the changes.
When an outstation or outstation set is promoted, it uses the default settings that you have defined, unless the settings are changed by the user.
When you have finished defining the default Promoted Dial Out settings, you can either Define the Point Update Setting or continue with the server configuration.
If you are unfamiliar with the server configuration process, we recommend that you proceed to learn about Points Settings.
Further Information
For more details on the OPC time format, see Using OPC Time Formats.
For more information on scanning outstations (both direct outstations and PSTN outstations), see the ClearSCADA Guide to Advanced Drivers.