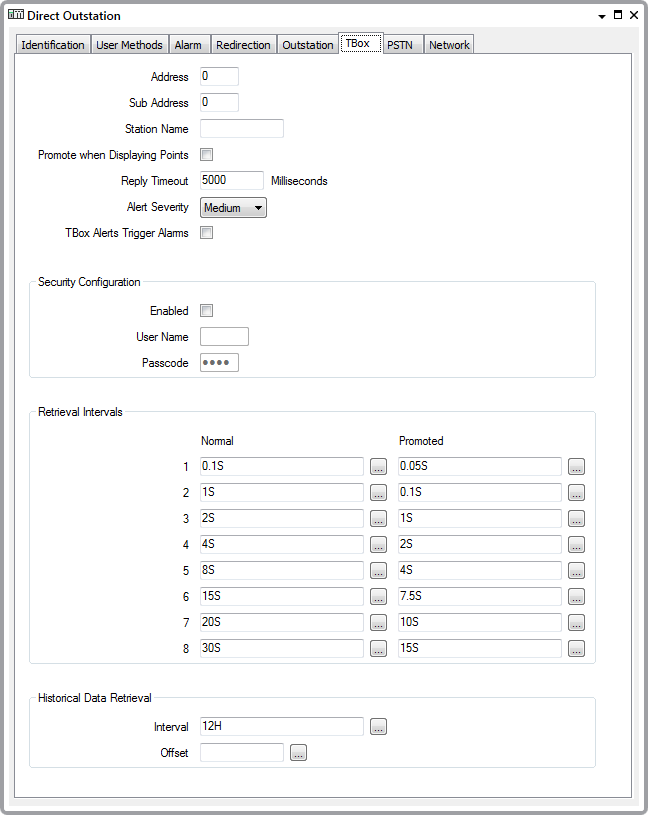
Use the fields on the TBox tab of the relevant TBox Outstation Form to configure these properties:

The first three fields on the TBox tab are used to uniquely identify the TBox device. A TBox RTU can be addressed by a combination of Address, Sub Address, and Station Name. Use whichever combination of these fields are required for your system's addressing scheme.
- Address: Use to specify the outstation Modbus address. The address is determined when commissioning the device.
- Sub Address: The Sub Address of the RTU. It is used in retrieving historical data. The Address combined with the Sub Address has to be unique within a system. If more than 255 devices are required, use the Sub Address to provide a unique combination. The Sub Address defaults to 0.
The Sub Address is also called the Secondary Address.
The Sub Address cannot differentiate devices on an multidrop link, so unique Addresses must be used for devices sharing a single multidrop link.
- Station Name: If required, use this field to specify the station name that uniquely identifies the RTU, alongside the Address and (if applicable), theSub Address.
- Promote when displaying points: Select this check box to give priority to scanning data for points being displayed (in a Mimic, for example). For more information, see Temporarily Increasing the Scan Rate in the Geo SCADA Expert Guide to Advanced Drivers, and see Define Whether an Outstation is Promoted While its Points are on Display in the Geo SCADA Expert Guide to Advanced Drivers.
- Reply Timeout: Use to define how long Geo SCADA Expert will wait for a response from an outstation. The default is 5000 milliseconds. If you need to change this, it will normally be in the context of deciding the server timeout settings (see Driver Settings in the Geo SCADA Expert Guide to Server Administration).
- Alert Severity: Use this combo box to define the priority of any alarms or events that are associated with the outstation (see Defining Severities in the Geo SCADA Expert Guide to Core Configuration).
- TBox Alerts Trigger Alarms: The TBox RTU can be configured to store alarms locally in the device. The alarms are referred to as alerts.
Select this check box if Geo SCADA Expert is to retrieve the alerts and process them as text alarms. As part of the retrieval process, Geo SCADA Expert stores two events per alert in the Event Journal—one providing details about the alert in the RTU, and the other indicating the raising of the text alarm.
Clear the check box if Geo SCADA Expert is to retrieve alerts and process them only as events (rather than as text alarms). As such, each retrieved alert produces a single event record, providing details about the alert in the RTU.
Regardless of the setting of the check box, you use the Retrieve Alerts pick action to retrieve the alerts. With PSTN outstations, and outstations with PSTN fallback, you can also configure the outstation to call Geo SCADA Expert if an alarm occurs in the RTU. Geo SCADA Expert then retrieves the alert during the call.
For more information, see Alarms on TBox.
- Security Configuration: Use this section of the TBox tab to match Geo SCADA Expert to the security settings configured on the TBox RTU if Read/Write access is required to the RTU. Because the RTU gives Read access by default, you need to configure this section only if Write access is required.
Geo SCADA Expert cannot configure the RTU, so Engineering level access is not required with Geo SCADA Expert.
- Retrieval Intervals: Use to specify the frequency with which the driver polls the RTU for point data (see Define the Data Retrieval Intervals)
- Historical Data Retrieval: Use the fields in this section of the tab to define a regular interval for retrieving historical data from points on the outstation. Historical data files include both Chronologies and Sampling Tables.
Enter the required interval in the OPC Time Format. You can enter the value directly in the field, or use the Interval window (accessed via the field's browse button) to specify the required value.
Enter the required offset in the OPC Relative Time Format. You can enter the value directly in the field, or use the Offset window (accessed via the field's browse button) to specify the required value.
You can use the Retrieve Historic Data pick action to retrieve Chronologies and Sample Table data between the intervals specified in this section.