When an alarm is raised on your system, you need to decide what to do about it. This can involve changing the alarm’s status, as well as taking action to investigate the cause of the alarm, for example contacting an engineer to check the piece of equipment that is registering the alarm.
To action an alarm:
- Access the context-sensitive menu of the database item to which the alarm relates. To do this, perform one of the following:
- Right-click on the alarm in the Alarm Banner.
- Right-click on the alarm on an Alarms List (see Alarms Lists).
- On an appropriate Queries List, right-click on the item for which the alarm has been raised. For example, if the alarm is associated with a point, right-click on the point on the relevant Points List, or Objects List (see Queries Lists in the ClearSCADA Guide to Lists).
- On a Mimic, either:
- Click on the representation of the item for which the alarm has been raised (see Alarms on Mimics). (This option only applies if the item on the Mimic is configured to display an Object menu.)
Or:
- Click on the relevant entry on a List embedded on the Mimic.
- Display the Database Bar (see Display an Explorer Bar). Use the Database Bar to locate the database item to which the alarm relates. Right-click on the item to display the context-sensitive menu for that item.
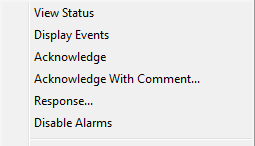
The item's context-sensitive menu is displayed (the figure below shows the menu for an item on a ViewX client). The menu includes any alarm actions to which you have access.

- On a WebX client, select the item in the Database Bar in order to display data associated with that item in the document display area. The item's context-sensitive menu is displayed in the top right of the document display area (see Working with Explorer Bars in the ClearSCADA Guide to ViewX and WebX Clients).
- Select the action you want to perform on the alarm.
The actions that are available vary depending, for example, on your User Account permissions and the alarm’s state. Access to the Acknowledge and Acknowledge with Comment actions might be further restricted for alarms on some database items (see Set Responsibility Action in the ClearSCADA Guide to Alarm Redirection).)
Typical actions include:
- Acknowledge or Acknowledge Alarms—Acknowledge an Alarm.
- Acknowledge With Comment—Acknowledge an alarm and associate it with a brief text description (see Acknowledge an Alarm with Comment).
- Disable Alarms—Withhold alarms for an item. You may want to disable alarms when a device that has been detected as faulty is causing nuisance alarms, or a device has been decommissioned (see Disable Alarms).
- Enable Alarms—Allow alarms to be raised for an item (see Enable Alarms).
- Response or Alarm Response—Record a response to an alarm without acknowledging it (see Respond to an Alarm).
- Remove or Remove Alarms—Remove an alarm from the display (see Remove an Alarm).
- Remove With Comment—Remove an alarm and associate the activity with a brief text description (see Remove an Alarm with Comment).
- Unacknowledge or Unacknowledge Alarms—Unacknowledge a previously acknowledged alarm (see Unacknowledge an Alarm).
- Unacknowledge With Comment—Unacknowledge a previously acknowledged alarm and associated the activity with a brief text description (see Unacknowledge an Alarm with Comment).
Additional ‘custom’ actions may be available from the Alarm Banner’s context-sensitive menu if:
- Alarm Banner scripts are used on your system. See a system administrator for the documentation associated with such custom actions on a ViewX client. For information on Alarm Banner scripts, see the ClearSCADA Guide to Scripting.
- Alarm Redirection is used to allow specific alarms to be redirected manually. For more information, see Redirect an Alarm.
NOTE: In addition to the pick actions mentioned here, ClearSCADA provides various methods that enable activities to be performed on alarms programmatically. This includes methods that are designed to trigger activities at specific times, such as the AcceptAtTime method that can be used to specify the time at which ClearSCADA is to acknowledge an alarm and to optionally log a comment for that acknowledgement. For more information on such methods, see the Database Schema (specifically the Methods section in the CAlarm class).