ATTENTION: This section and associated topics apply to the Original WebX client only.
Mimics can contain hyperlinks to displays on the local system and to displays in other databases. For example, you could display a Mimic that is stored on the system to which you are currently connected, and that Mimic could contain a hyperlink to a Crystal Report that is stored on a different system. In such a scenario case, the Crystal Report is the 'target' display for the hyperlink.
On ViewX clients, a hyperlink to another system will work as long as the ViewX client can connect to its local system and the other system (and the client-server connections are healthy). However, on Original WebX clients, the hyperlinks can only be used if:
- An Original WebX client license is available for use on the server on which the 'target' display is located (see Understand the License Details Window on a Geo SCADA Expert Server in the Geo SCADA Expert Guide to Server Administration)
- The server to which the Original WebX client is connected can identify and locate the 'target' display. To do this, the server needs to be configured to have appropriate Cross-Database Hyperlinks settings, so that it can match the system name in a hyperlink to the node name and port of a server in the system that contains the ‘target’ display.
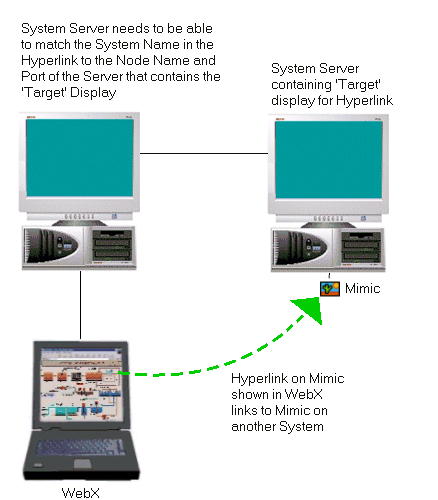
The Cross-Database Hyperlinks settings allow Original WebX users to use hyperlinks to access 'target' displays that are stored on Geo SCADA Expert systems other than the system to which the Original WebX client is connected. The 'target' displays can comprise 'file' type objects or Lists. For example, Mimics can contain hyperlinks that allow users to access:
- other Mimics
- Trends
- X-Y Plots
- Lists
- Alarms Lists
- Crystal Reports.
To configure the Cross-Database Hyperlinks settings:
- Display the Server Configuration Tool and log on if required.
You need to configure the Cross-Database Hyperlinks settings on:
- The server to which the Original WebX client connects. This is the 'local system' for the Original WebX client.
- The servers that run the databases that contain the 'target' displays. This only applies if the 'target' displays have hyperlinks to items that are stored in other databases (either back links to the Original WebX client’s 'local system' or forward links to other displays stored on other systems).
- Expand the System Configuration branch of the tree-structure.
- Select the WebX entry.
- In the Cross-Database Hyperlinks section, right-click on the list to display a context-sensitive menu.
- Select the Add option to display the Add Hyperlink window.
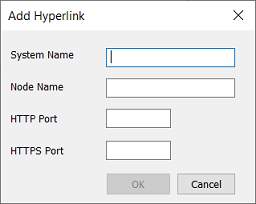
- Configure the settings as follows:
- System Name—Enter the name of the ‘target’ system (the name of the database that contains the displays to which the hyperlinks connect).
- Node Name—Enter the name or IP address of the server that runs the 'target' system (the server that runs the database that contains the ‘target’ display).
- HTTP Port—Enter the number of the non-secure web server port (XML) used by the ‘target’ system. This typically has to match the number configured in the HTTP port field in the Local Proxy section of the WebX settings for the ‘target’ system (see Define the Local Proxy Settings for the Original WebX Server in the Geo SCADA Expert Guide to Security). The exception to this is if your system uses a proxy server or proxy firewall for communications between the Web server and Original WebX clients (see Define the Network Proxy Settings for the Original WebX Server) and the Original WebX clients communicate with Geo SCADA Expert via the proxy. With such a setup, you typically specify the non-secure port on the proxy server that maps through to the Original WebX server port - that is, the proxy port number that matches the Mapped HTTP Port configured in the Original WebX Proxy settings for the 'target' system (see Define the Network Proxy Settings for the Original WebX Server).
With a system that uses a proxy server or proxy firewall for Original WebX communications you can specify the HTTP port used by the 'target' system's Original WebX server, but we do not recommend this as the Original WebX server can be identified from this information.
- HTTPS Port—Enter the number of the secure web server port (XML) used by the ‘target’ system. This typically has to match the number configured in the HTTPS port field in the Local Proxy section of the WebX settings for the ‘target’ system (see Define the Local Proxy Settings for the Original WebX Server). The exception to this is if your system uses a proxy server or proxy firewall for communications between the Original WebX server and Original WebX clients (see Define the Network Proxy Settings for the Original WebX Server) and the Original WebX clients communicate with Geo SCADA Expertvia the proxy. With such a setup, you typically specify the secure port on the proxy server that maps through to the Original WebX server port - that is, the proxy port number that matches the Mapped HTTPS Port configured in the WebX Proxy settings for the 'target' system (see Define the Network Proxy Settings for the Original WebX Server).
With a system that uses a proxy server or proxy firewall for Original WebX communications you can specify the HTTPS port used by the 'target' system's Original WebX server, but we do not recommend this as the Original WebX server can be identified from this information.
- Select the OK button to confirm the hyperlink settings and close the Add Hyperlink window. The hyperlink settings you have defined are shown in the list in the Cross-Database Hyperlinks section.
- Repeat steps 4-7 inclusive for each system as appropriate.
- Apply the changes to the server.
Example 1:
A Mimic named 'Pipeline 6' is created in ViewX on a system named 'ControlSiteA'.
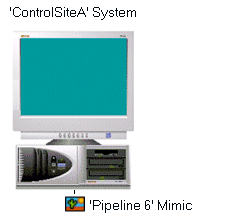
The 'Pipeline 6' Mimic is configured to contain a hyperlink to a Mimic named 'Valve Controls' on another system called 'Site44'.
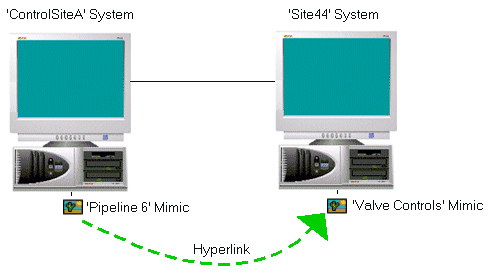
The node name of the server that runs the 'Site44' database is 'Pd16' and it uses port 443 for its secure XML web connection. The server does not use a non-secure XML web connection, so the HTTP port it left at its default of 0. The web server ports are defined in the WebX settings on the Server Configuration Tool on the 'Site44' server.
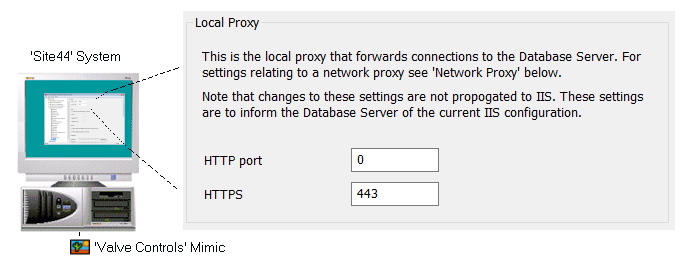
A user logs on to an Original WebX client that connects to the ‘ControlSiteA’ server. The user displays the ‘Pipeline 6’ Mimic and selects the hyperlink to the ‘ValveControls’ Mimic that is stored in the database of the ‘Site44’ system. However, as the Cross-Database Hyperlinks settings have not been configured correctly on the ‘ControlSiteA’ server, the ‘ControlSiteA’ server cannot determine which system contains the ‘target’ display for the hyperlink. As a result, the ‘target’ display cannot be shown and a diagnostics message is displayed.
The Cross-Database Hyperlinks settings are reconfigured on the ‘ControlSiteA’ server. They are configured so that the System Name is Site 44, the Node Name is Pd16, the HTTP Port is 0 and the HTTPS Port is 443. These match the system name, node name and port settings (for the Original WebX server) of the ‘Site44’ server.
With the corrected Cross-Database Hyperlinks settings in place, the user re-displays the Mimic on the Original WebX client and selects the hyperlink to the ‘Valve Controls’ Mimic. As the ‘ControlSiteA’ server now has the correct Cross-Database Hyperlinks settings, it can use the information in the hyperlink to identify the location of the ‘target’ display as being the ‘Site44’ server. As a result, the ‘target’ display (the ‘Valve Controls’ Mimic) is displayed on the Original WebX client.
Example 2:
With the Geo SCADA Expert system mentioned in Example 1 above, security measures are reviewed. With Geo SCADA Expert 2021 onwards, a local IIS reverse proxy is installed and configured as part of the Geo SCADA Expert installation. Among other security tightening measures, it is decided to use this local IIS reverse proxy to perform TLS negotiation on behalf of the Geo SCADA Expert server. The local proxy itself is configured in IIS and the WebX settings in the Server Configuration Tool are used to inform the Geo SCADA Expert server of the current IIS configuration. The Server Configuration is updated accordingly (the Local Proxy and mapped Network Proxy settings are defined as part of the WebX settings on the Server Configuration Tool on each server). Additionally, the Original WebX clients are configured to communicate with Geo SCADA Expert via the proxy servers rather than directly via the Original WebX server (see Connect to the System via an Original WebX Client or XML Client).
With the 'Pipeline 6' Mimic, the Cross-Database Hyperlinks settings are reconfigured on the 'ControlSiteA' server so that they match the Network Proxy settings that exist on the 'Site44' server (the server on which the 'target' Mimic is located). The settings include the Proxy Server name 'LocalProxy', the Mapped HTTP proxy port 0, and the Mapped HTTPS proxy port 8842, as well as the Node Name of the proxy server.
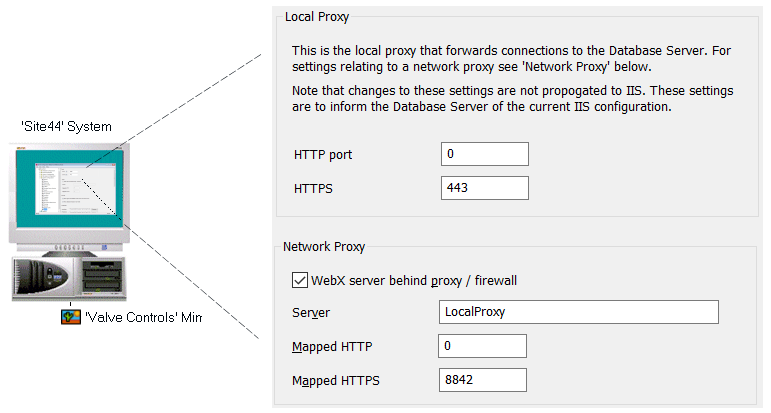
With the updated Cross-Database Hyperlinks settings in place, when a user displays the 'Pipeline 6' Mimic on the Original WebX client and selects the hyperlink to the 'Valve Controls' Mimics, the 'target' display (the 'Valve Controls' Mimic) is displayed on the Original WebX client as expected. The user is unaware that a proxy server is in use (although the Original WebX client's address URL and other settings now contain the proxy server's details rather than the Original WebX server's details).