The properties described in this topic apply both to User Forms and User Pattern Forms. (User Patterns only apply to systems on which ClearSCADA can create new User accounts automatically as part of an External Authentication process. For more information, see Create User Accounts from a User Pattern.)
Each user can be contacted via e-mail, pager, and voicemail. This is useful for sending information and alerting individual users.
Users can only be contacted via e-mail, pager, and voicemail if the Contact Information settings have been configured in their user accounts. The Contact Information settings define the e-mail address, pager ID and service, and voicemail number, ID and PIN for the user.
ALARM NOTIFICATION SENT TO USER GROUPS AND USER ROSTERS
To define the contact information settings for a user account:
-
Either:
- Display the relevant User Form (to define the settings that apply to an individual User account).
- Display the relevant User Pattern Form (if applicable to your system, to define the settings that ClearSCADA is to apply to new User accounts that it might be triggered to create automatically at logon.)
- Select the Contact Information tab.
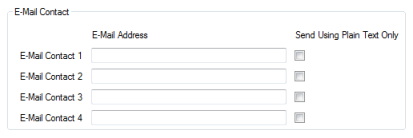
- Define the e-mail contact settings in the E-Mail Contact section:

- In the E-Mail Contact field, enter an e-mail address that can be used to contact the user of this account.
- Select the Send Using Plain Text Only check box to enforce plain text only e-mails for this user account. Alternatively, clear the check box to allow HTML e-mails.
- Repeat steps i and ii for up to 4 e-mail addresses.
- Use the Pager Contact section to define the Pager ID and Pager Service:

- In the Pager Contact field, enter the pager ID for the pager. Each pager has a unique ID, for example, the phone number of the user's mobile telephone.
You need to include the + prefix and the country code for the mobile telephone number, otherwise ClearSCADA will not be able to match the number in SMS messages to the Pager ID. Do not enter the international dialing code, for example, enter '+447901987654' and not '00447901987654'.
- Use the browse button feature of the Pager Service field to select an appropriate pager service. You can only select a pager service if a pager service item has been added to the database (seethe Pagers Guide).
- Use the SMS Commands check box to define whether the user is authorized to execute actions in SMS commands (received via the device that is associated with the Pager ID).
- If the SMS Commands check box is selected, the user can execute actions in SMS Commands (received on the device with the corresponding Pager ID). However, the user also requires the relevant security permissions for the action (see Permissions for Database Items).
- If the SMS Commands check box is clear, the user cannot execute actions in SMS commands received via the corresponding pager device.
- Repeat steps i-iii for up to four pagers.
- In the Pager Contact field, enter the pager ID for the pager. Each pager has a unique ID, for example, the phone number of the user's mobile telephone.
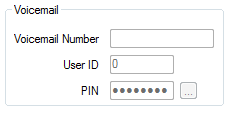
- Use the Voicemail section to define the voicemail settings. The voicemail feature is designed for use with automated answering systems such as Envox. It allows users to respond to alarms via telephone.
Define the voicemail settings as follows:

- Voicemail Number—Enter the number that is used to access the voicemail service for this user account. The voicemail number is not used by ClearSCADA but is stored in the database so that it can be sent to other software, such as Envox, in an e-mail message (alarm redirection). The Third Party software can then use the number in the e-mail to contact the user's telephone.
- User ID—Enter the user identity for the voicemail feature of this user account. The User ID works in much the same way as the Username that is used when logging on to ClearSCADA, except that the User ID is only used when logging on via a telephone. The user will enter the User ID by using the key pad on their telephone.
- PIN—Use the browse button feature of the PIN field to display the Change PIN window. You can then use the Change PIN window to define the new Personal Identity Number (PIN) for the voicemail account for this user.
The PIN works in much the same way as the Password that is used when logging on to ClearSCADA, except that the PIN is only used when logging on via a telephone. The user will enter the PIN by using the key pad on their telephone.
The Voicemail settings are only available if the Phone Access Type is enabled (see Define whether a User can Access the System via ViewX, WebX, Original WebX or Phone).
Further Information
For information on Rejected SMS Messages and other SMS Command failures, see the ClearSCADA Guide to the Pager Driver.