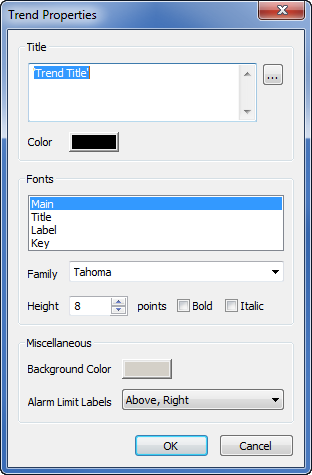
When you create a new Trend it uses the default display settings that are defined on the Options window (see Define the Default Settings for New Trends). You can change the display settings for an individual Trend so that they are different to the default Trend settings. This is useful when you want a Trend to have different colors or fonts.
To configure the display settings for a Trend:
- Display the Trend in Design mode (see Display a Trend in Design Mode).
- Right-click in the main display area of the Trend (the area that will contain the traces).
A context sensitive menu is displayed. -
Select the Edit Properties option.
The Trend Properties window is displayed.
- Use the Title section to define and format the Trend’s title:
- Title—Enter the text for the title on the Trend. As with other labels, the text for the title has to be enclosed in single straight quotation marks like this: 'Title text'.
You can also use the browse button to locate and select a tag. The name of the tag will be used as the ‘Title’. When selecting a tag, you can select the Relative check box for a relative reference or clear it for an absolute reference. For more information, see Relative and Absolute References.
- Color—Select this button to open a color palette to select a color for the title. You can choose any of the colors or use the ... option to create a custom color (see The Color Palette Window).
- Title—Enter the text for the title on the Trend. As with other labels, the text for the title has to be enclosed in single straight quotation marks like this: 'Title text'.
- Use the Fonts section to set the appearance of the text used in the body of the Trend
- Select the category:
- Main—Choose Main to define the font settings for the text used in the body of the Trend.
- Title—Choose Title to define the font settings for the text used in the Title that is shown at the top of the Trend.
- Label—Choose Label to define the font settings for the text used in labels on the Trend, such as the axis labels.
- Key—Choose Key to define the font settings for the text used in the Key list at the bottom of the Trend.
- Use the Family combo box to choose the style of font to be used.
- Use the Height spin box to define the size of the text in points (point size is the standard term used for font sizes and does not relate to database points).
- Use the Bold check box to choose whether the text is emboldened.
- Use the Italic check box to choose whether the text is italicized.
- Repeat steps i-v for each of the categories (Main, Title, Label, Key) as required.
- Select the category:
- Use the Miscellaneous section to define the:
- Background Color—Select this button to open a color palette. Use the color palette to select a color or create a custom color for the Trend’s background. (see The Color Palette Window).
When you create a Trend, it uses the default color scheme that is defined by your operating system—typically, it sets the background of the Trend as gray and the foreground (the X-Axis, labels, and so on) as black. To change the default settings, use the Windows® Control Panel to define the Display settings.
- Alarm Limit Labels—Selects the position for the Alarm Limit Labels (constant alarm limits only; this option does not apply to alarm limits that are associated with Time Profiles). The available options are:
- None—Alarm limit labels are not displayed.
- Above, Left—Display alarm limit labels above the alarm limit line and on the left hand side of the Trend data area (inside the left Y-Axis).
- Above, Right—Display alarm limit labels above the alarm limit line and on the right hand side of the Trend data area (inside the right Y-Axis).
- Over, Left—Display alarm limit labels over the top of the alarm limit line and on the left hand side of the Trend data area (inside the left Y-Axis).
- Over, Right—Display alarm limit labels over the top of the alarm limit line and on the right hand side of the Trend data area (inside the right Y-Axis).
- Left—Display alarm limit labels beside the alarm limit line on the left outside the Trend data area (outside the left Y-Axis).
- Right—Display alarm limit labels beside the alarm limit line on the right outside the Trend data area (outside the right Y-Axis).
The Trend Properties window for an individual Trend does not have a Trace Line Width setting. This is because you can configure the line width for each trace individually, as required (see Configure a Trace). The Trace Line Width setting is only available on the Trend Properties window when you are defining the default settings for all new Trends (see Define the Default Settings for New Trends).
- Background Color—Select this button to open a color palette. Use the color palette to select a color or create a custom color for the Trend’s background. (see The Color Palette Window).
- Select the OK button to close the Edit Properties window.
The Trend will display the changes you made. - Save the configuration.