To manage access to the system, you can create user accounts and allocate them to the users that need access to ClearSCADA. You can then configure each user account to provide or restrict access to various features. User accounts are used when accessing ClearSCADA via ViewX, WebX, or a third-party application that supports client security.
To define default security settings for new User accounts, specify the required settings using the Security section of the Server Configuration Tool (see Define the Default Security Settings for New User Accounts).
On a new ClearSCADA installation , you initially use a Super User account to log on to ClearSCADA in order to create at least one system administrator-level user account. To create a user account, you have to log on via a user account that has the Configure and Security permissions for the system or Group. In ViewX, you also need the Configure Database setting enabled on your user account (set via the User Form for the user account).
If your system uses External Authentication and the server is configured to Create users automatically from group membership, you typically use a User Pattern to define the settings for new User accounts, rather than create new User accounts directly in ClearSCADA. For more information, see Create User Accounts from a User Pattern. On such a system, you only have to create User accounts manually in ClearSCADA for those users that are not integrated with Windows or LDAP user profiles. You do this using a User database item, rather than a User Pattern. The rest of this topic explains how to create a User account using a User database item.
If ClearSCADA is not configured to Create users automatically from group membership, you have to create User accounts manually in ClearSCADA using the User database item. The rest of this topic explains how to do this.
To create a new user account manually (you only need do this if ClearSCADA is not configured to create the new users automatically via a User Pattern):
- Create a User Database Item.
- Display the User Form.

- The User Form includes several tabs that are common to many database items:
Identification—Use to optionally define a Help View and to indicate whether the item is to be excluded from any Exclusive Control activity (see Defining Identification Details).
Location—Use to specify the item's geographical coordinates. (You need only configure the properties on this tab if your system uses ClearSCADA's Geographical Location features.)
User Methods—Use to define any custom pick actions (‘methods’) for the item (see Using the User Methods Tab to Define Custom Actions).
- Use the Regions tab to Assign Regions of Responsibility to the user. (You need only configure the properties on this tab if your system uses ClearSCADA's Geographical Location features.)
The user will also inherit any regions that are assigned to any User Groups of which that user is a member.
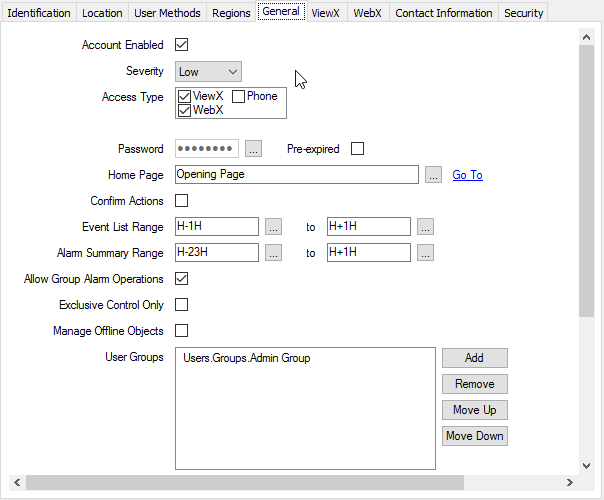
- Use the General tab to define general user account settings. For more information, see the topics that are listed in the gray footer section at the bottom of this topic. Select the relevant entry to display the topic that you require.
New user accounts use the settings for the Guest account as their default General settings. For information on configuring the Guest user account, see Configuring the Guest User Account.
- Use the ViewX tab to define user account settings that apply to ViewX and WebX. For more information, see the topics that are listed in the gray footer section at the bottom of this topic. Select the relevant entry to display the topic that you require.
- Use the WebX tab to define user account settings that apply to WebX only. For more information, see the topics that are listed in the gray footer section at the bottom of this topic. Select the relevant entry to display the topic that you require.
- Use the Contact Information tab to Define the E-Mail, Pager, and Voicemail Contact Settings for a User.
- Use the Security tab to Define the Security Settings for a User
The settings on the Security tab only apply if the user account is managed directly in ClearSCADA. With a User Account that is associated with a Windows or LDAP User Profile, password management is performed via the relevant Windows domain or LDAP server.
- Save the configuration.
When you have configured a user account, you will need to define its access permissions (see Allocating Security Permissions). After setting the permissions, you can allocate the user account to a user—you will need to inform the user of their username and password (and, if applicable, their ID and PIN).