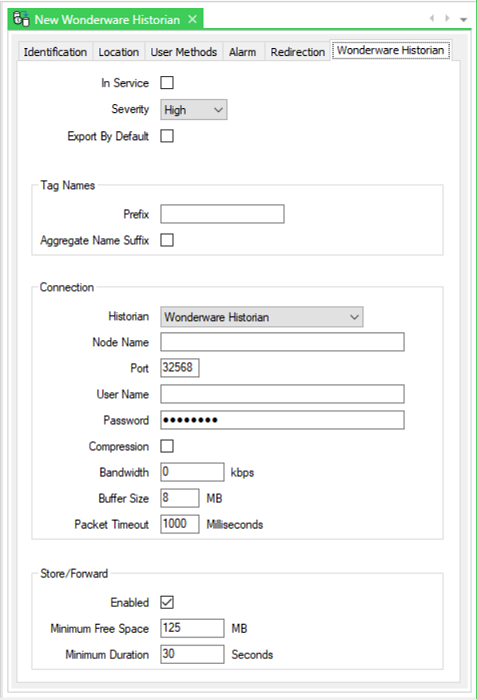
To configure a database item that represents a connection to a Wonderware Historian, you need to display the Wonderware Historian Form (see Display a Form) and configure the relevant settings on that Form.

The Form has several tabs:
- Identification—Use to optionally define a Help View and to indicate whether the item is to be excluded from any Exclusive Control activity (see Defining Identification Details).
- Location—Use to specify the item's geographical coordinates. (You need only configure the properties on this tab if your system uses ClearSCADA's Geographical Location features.)
- User Methods—Use to define any custom pick actions (‘methods’) for the item (see Using the User Methods Tab to Define Custom Actions).
- Alarm—Use to define optional features associated with alarms (see Defining an Item or Group’s Alarm Properties).
- Redirection—Use to define any alarm redirections for the item (see Configure Alarm Redirections for an Item or Group).
Use the fields on the Wonderware Historian tab to define the connection properties that enable ClearSCADA to communicate with the Wonderware Historian server:
- In Service—Select this check box to activate the network connection to the Wonderware Historian server (see Placing an Item In Service). You should only do this once you have configured the other settings on this form (especially the properties in the Tag Names section of the tab - see Specify the Properties that are Associated with Tag Names). ClearSCADA will then automatically use HCAL to open a connection to the Wonderware Historian and start to export data.
Clear this check box if you want ClearSCADA to close the connection to the Wonderware Historian and stop exporting data.
If the Wonderware Historian database item is used for exporting historic data but is subsequently placed out of service, data that is added to ClearSCADA's historian during that time will not get exported to the Wonderware Historian server. Once the Wonderware Historian database item is placed back In Service, data export will resume and will include the relevant data that is added to ClearSCADA's historian from that moment onwards.
- Severity—Use this combo box to define the priority of any alarms or events that are raised during the data export to the Wonderware Historian (see Define the Severity Level when the Type is Fixed in the ClearSCADA Guide to Core Configuration).
- Area of Interest—ClearSCADA will only display this field if the Area of Interest feature is enabled on your system. Use this field to specify the Area of Interest that you want to associate with any alarms or events (see Assign a Different Area of Interest to an Item’s Alarms and Events in the ClearSCADA Guide to Core Configuration).
- Export By Default—When you create a new point or accumulator, ClearSCADA can automatically start to export the point or accumulator data to this historian (if historic is enabled). ClearSCADA can also do this when a user enables historic on an existing point or accumulator. Select this check box to enable this feature. Clear this check box to disable it. For more information, see Define the Historic Export Details in the ClearSCADA Guide to Core Point Configuration.
For information about configuring properties in the Tag Names, Connection, and Store/Forward sections of the Wonderware Historian tab, see the relevant topics in this section. For more information, see the topics that are listed in the gray footer section at the bottom of this topic. Select the relevant entry to display the topic that you require.
Further Information
Specify the points and/or accumulators for which you want to export historic data using the Wonderware Historian database item: see Define the Historic Export Details in the ClearSCADA Guide to Core Point Configuration.