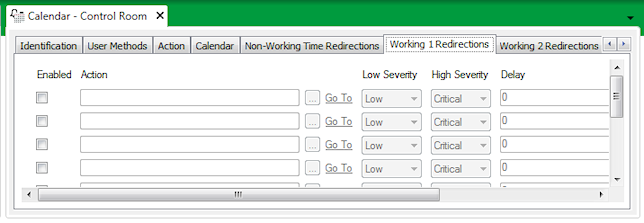
You use the fields on the Non-Working Time Redirections tab and the seven Working Redirections tabs on the Calendar Form to configure sets of alarm redirections. You can configure up to 10 alarm redirections or alarm redirection rosters per Redirections tab.

Each alarm redirection set corresponds to a specific Redirections List that you can allocate to specific days or dates on a Calendar. For instance, you use the Non-Working Redirections List in the Edit Day Schedule window to schedule the times from which ClearSCADA runs the set of alarm redirections that are configured on the Non-Working Time Redirections tab of the Calendar Form. Similarly, you use the Working 1 Redirections List to schedule the times from which ClearSCADA runs the set of alarm redirections that are configured on the Working 1 Redirections tab, and so on.
For more information, see Define the Alarm Redirection Schedule for a Day, and see Examples of Calendar Configuration.
To configure an alarm redirection entry on any of the Redirections tabs on the Calendar Form:
NOTE: You need to have configured the required Redirection Actions (see Configure a Redirection Action) and Action Rosters (see Configure an Action Roster) before you can select the actions and action rosters for alarm redirection.
- Select the Enabled check box to indicate that a redirection action is in use.
Other fields in the row become available for use.
(Clear the Enabled check box for any rows that you do not want to use.)
- Use the Action field to specify the Action or Action Roster that is to be performed when this set of Redirection Actions is scheduled to run.
Use the browse button adjacent to the Action field to display a Reference browse window and select the required action or action roster from the window.

- Use the Low Severity and High Severity combo boxes to define the severity range within which alarms are redirected. Any alarms that occur outside of the specified severity range are not redirected.
For more information on using severity ranges to redirect alarms, see Define the Severity Range.

- Use the Delay field to suspend the alarm redirection for a specified amount of time. Enter the time in the OPC Time Format. You can enter the value directly in the field, or use the Interval Window (accessed via the field’s browse button) to specify the required delay.
The alarm is not redirected until the Delay time expires. If the alarm changes to the Abort State (see below) within the Delay time, the alarm is not redirected.To redirect an alarm as soon as it is raised, you should set the Delay to 0, and the Abort State to ‘Never’.
For more information on using the Delay feature, see Define a Delay.

- Use the Abort State field to specify the alarm state that causes the alarm redirection to be canceled. Use this property in conjunction with the Delay time (see above) to specify the circumstances under which redirection is canceled. For example, if the alarm is acknowledged within the Delay time.
For more information on aborting redirections, and the Abort States that you can select, see Define the Abort State.

- Repeat the steps above for any other alarm redirections that you want to configure.
- Save the configuration (see Saving Configuration Changes in the ClearSCADA Guide to Core Configuration).