By using ClearSCADA's security settings, you can control which features and items are available to users on Original WebX clients. You can also allow users to log on to ClearSCADA via Windows or LDAP user accounts.
With suitable security settings in place, you can:
- Help to protect your system from unauthorized use
- Restrict access to certain features, so that users can only work with the settings that are appropriate to their duties and training.
Some of the settings that apply to ViewX clients also apply to Original WebX clients. So if you have already configured the security settings for ViewX, you may not need to define all of the security settings again for Original WebX. However, there are some settings that are specific to WebX which you will need to configure.
To configure the security settings for WebX and Original WebX clients, you need to use several different displays:
- On the Server Configuration Tool:
- Use the Security section to:
- Use the External Authentication section to define the External Authentication settings (if you are Using External Authentication with ClearSCADA)
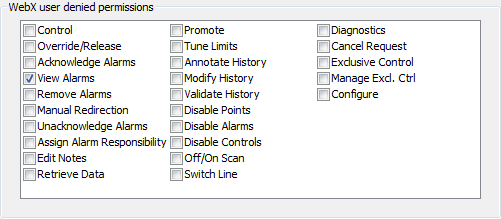
- In the Permission Restrictions section use the WebX user denied permissions section to restrict access to permissions (and the features to which they relate) for WebX and Original WebX users.

For more information, see Define whether a User can Only Work with Items under their Exclusive Control.
- Use the WebX section to define the Original WebX-specific ports, proxy, security and certificates settings:
- Define the Ports Settings for Original WebX Clients
- Define the Proxy Settings for the Web Server
- Define the Access Settings for Non-Secure Original WebX Connections
- Define the Certificates Settings for Original WebX Clients.
The WebX section also includes Stylesheets & Images, Alarm List, Cross-Database Hyperlinks, Logon Action and Trace settings. These settings apply to Original WebX clients but do not relate to security. For more information,see WebX Server Settings in the ClearSCADA Guide to Server Administration.
- In ViewX:
- Define the security settings for the Web user.
If you use Original WebX without logging on, ClearSCADA logs you on as the Web user automatically. As the Web user, you are able to access features and displays in accordance with the configuration of the Web user’s settings and preferences. You can configure these settings by using the:
- Options window (see Configuring the Guest User Account).
- Guest User tab on the System Form (see Define the Global Settings for the Guest User Account).
- Add and configure user accounts (see User Accounts)
- Add and configure User Groups if required (see User Groups)
- Allocate suitable permissions to the user accounts and User Groups (see Allocating Security Permissions).
- Define the security settings for the Web user.
Further Information
Restrict client access to ClearSCADA: see Add Clients to the Client Access Control List in the ClearSCADA Guide to Security.