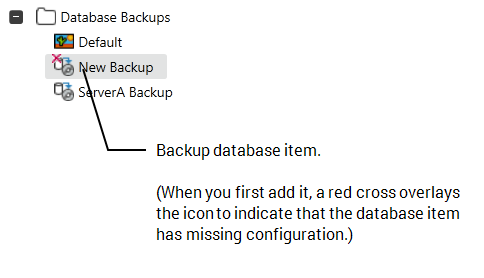
To backup your ClearSCADA files, you use a Backup database item. This item stores the various settings for the backup, including the location of the backup files and the type and amount of data to be backed up.
You need to define a Windows User Account if you want to use backups over a network, (see Backing up a Database Over a Network).
Creating a Backup database item
- Run ViewX and log on via a User Account that has the Configure Database feature enabled.
- Display the Database Bar (see Display an Explorer Bar).
-
Right-click on the System or Group that is to contain the Backup item, and then select Create New, followed by Other, and then Backup.
A Backup database item is added. It is selected automatically, ready for you to define its name.
- Enter an appropriate name for the Backup item (see Naming Restrictions) and then press Enter (or select another part of the ViewX interface).
Configuring a Backup database item
- Display the configuration Form for the Backup item (see Display a Form).
-
Configure the Identification, User Methods, Alarm and Redirection settings as required. These are common configuration settings and you can configure them in the same way as on other configuration Forms).
For more information, see:
-
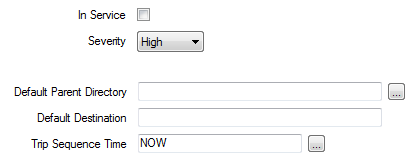
Display the Backup tab and use the fields at the top of the tab to configure the following settings:

- In Service—Use to set the Backup item to be active or inactive (see Placing an Item in Service).
- Severity—Use the combo box to define the priority of any alarms or events that are associated with the Backup item (see Defining Severities).
- Area of Interest—This field is only displayed if the Area of Interest feature is enabled on your system. Use the field to specify the Area of Interest with which the item's alarms and events are to be associated (see Assign a Different Area of Interest to an Item's Alarms and Events). For further information about the Area of Interest feature, see Restrict Alarm and Event Access to Specific Areas of Interest.
- Default Parent Directory—Define the directory that will contain the backup directories that ClearSCADA creates whenever a backup is triggered using this Backup database item. You can use the browse button to choose a location or you can enter the directory manually.
- Default Destination—Define the name of the directory that ClearSCADA creates automatically whenever a backup is triggered using this Backup database item. ClearSCADA uses the directory to store a copy of the files that are being backed up. ClearSCADA will automatically add the directory to the directory that you specified in the Default Parent Directory field, as part of the backup process. (The exception to this is if a different destination is specified when the backup is triggered.)
You can include Date and Time trip sequence characters in the directory name if required; this is useful for storing backups in chronological order. The trip sequence characters add the date and/or time to the name of the Default Destination directory.
To include a date trip sequence, use the format:
_%D<date format>%
Where
<date format>is the format of the date you want to add, for example, yyyy-MM-dd. Do not include the angle brackets.To include a time trip sequence, use the format:
_%T<time format>%
Where
<time format>is the format of the time you want to add, for example, HH-mm. Do not include the angle brackets.So a date and time trip sequence could be:
_%Dyyyy-MM-dd%_%THH-mm%
You should create destination settings that will create unique backup folders each time that the backup is run. The backup will fail if you set the destination to the same or repeating folders. For example,
Backup_%Dddd%will create backup folders for each day of the week:Backup_mon, Backup_tue and so on.
This allows for seven backups folders to be created for the first week, but the backups will not work for subsequent weeks unless the folders are removed.
- Trip Sequence Time—Use to specify the start time for the trip sequence (only applicable if you have defined a trip sequence in the Default Destination). For example, if you set the Trip Sequence Time to Second, the trip sequence will begin at the start of the current second. Usually, the default setting of NOW is appropriate.
You specify the time in the OPC Relative Time Format. For examples and information about the time units that you can use to specify the Trip Sequence Time, see OPC Relative Time Format.
-
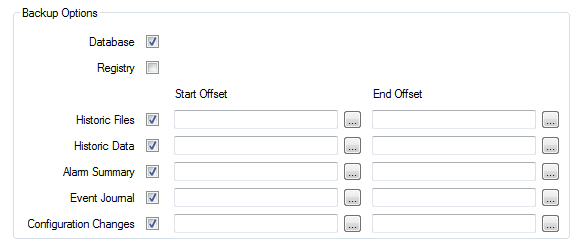
Define the Backup Options settings:

-
Use the check boxes to define whether the backup will include the Database, Registry, Historic Files, Historic Data, Alarm Summary, Event Journal, and Configuration Changes files. If you select the check box, the relevant type of file will be included in the back up; if you clear the check box, the relevant type of file will be excluded from the back up.
The files that are backed up if you select the Database check box include those that relate to Metadata, Configuration, Data, and Data files. For more information about these files and the type of data they include, see Locations of the Database Folders.
-
Use the Start Offset and End Offset fields to specify the time period for which data is to be backed up (these settings do not apply to Database or Registry backups). If you leave both of these fields blank, ClearSCADA will back up all of the data regardless of its age.
Example:
The Start Offset is set to
Week - 10 Weeksand the End Offset is set toWeek - 2 Weeks. The backup will contain data that is time-stamped between:10 weeks before the start of the current week
and
2 weeks before the start of the current week.
If you select the browse button(s), an Offset window is displayed. You can use the Offset window to define the time periods (see Offset Window). Alternatively, you can enter the time periods in the fields manually; either way, you have to specify the offset in the OPC Relative Time Format.
We recommend that you consider very carefully what type of backup you should do. For example, if you do a full backup of all of your historic data, this could potentially take a long time and use a large amount of disk space. However, restoring the data is likely to be straightforward. If you do a partial backup of your most recent historic data, this will probably take less time and use less disk space. For example, you might do a weekly backup containing just your previous week's data. However, such a backup may prove more complex to restore. This is because you may have to merge many backup files to fully restore the data. For more information, see Load your Backup Database Files.
-
Use the check boxes to define whether the backup will include the Database, Registry, Historic Files, Historic Data, Alarm Summary, Event Journal, and Configuration Changes files. If you select the check box, the relevant type of file will be included in the back up; if you clear the check box, the relevant type of file will be excluded from the back up.
- Use the Archive Options to create a backup zip file in addition to, or instead of the regular backup folders and files. The Archive option creates a compressed file that contains a copy of all the selected backup folders and files, using the ZIP format. Configure the following properties to create an archive file:

- Create Archive—Select this check box when you want to create the ClearSCADA_Backup_<System>.zip archive file. This file is stored in the Default Destination.
- Compression Level—Specify the level of compression that is to be applied when creating the ClearSCADA_Backup_<System>.zip file that contains the backed up files. Choose from:
- No Compression—The files are not compressed when they are added to the zip file.
- Fastest Compression—This type of compression prioritizes speed over file size.
- Optimal Compression—This is the default option. This type of compression prioritizes file size over compression speed.
- Erase Files—During the backup process, ClearSCADA creates directories for each of the types of files that it is required to backup. It places these directories in the Default Destination directory (or whichever destination directory was specified when the backup was triggered). Into each of these directories, ClearSCADA places a copy of the files that it is backing up. In addition, ClearSCADA creates a zip file that contains a copy of the backed up files in their respective directories (having applied the specified Compression Level to those files when adding them to the zip file).
Select the Erase Files check box to delete the files and directories that ClearSCADA has placed in the Default Destination directory once it has created the zip file. The zip file itself is not erased.
Clear the check box to retain the files and directories that ClearSCADA has placed in the Default Destination directory, in addition to retaining the zip file.
- If you want ClearSCADA to perform a specific action when the backup is complete, use the Completion Method settings:

- Use the Method Object field to choose the database item that has the method you want ClearSCADA to call upon backup completion.
- Use the Method field to choose the specific method (of the Method Object) that will be called.
Example:
A System Command database item named 'Copy Zip File' is created in the database. It is configured so that, when executed, it will copy the generated ClearSCADA_Backup_<System>.zip file to a remote server. The copy process is to occur automatically when the database has been successfully backed up, so the following settings are configured for the Backup item:
- Method Object: Copy Zip File
- Method: Execute()
(For a more detailed example that further demonstrates such a process, see Example 3: Back Up a Database and Copy the Resulting Zip File Over a Network.)
If you do not want ClearSCADA to perform an action when a backup completes, leave the Completion Method settings clear.
- Save the configuration.
The Backup item is now configured.
To initiate a backup, the Backup action/method needs to be triggered. It can be triggered manually via the Database Bar, a suitably configured Mimic, a database List, and so on. Alternatively, it can be triggered automatically via a Schedule or Logic program. For more details, see Initiate a Database Backup Manually